Introduction
The chocolate chip cookie, a beloved dessert that has captured the hearts—and taste buds—of people around the world, has a rich and delightful history. It all began in 1938 when Ruth Wakefield, owner of the Toll House Inn in Whitman, Massachusetts, created the first chocolate chip cookie by combining a butter drop cookie recipe with chunks of semi-sweet chocolate. Little did she know that her creation would become a staple in American households and inspire countless variations and adaptations over the decades.
There’s something irresistibly charming about homemade chocolate chip cookies. Unlike store-bought versions, which often contain preservatives and artificial flavors, homemade cookies offer a warm, fresh-from-the-oven aroma that fills your kitchen and creates a sense of nostalgia. The ability to customize your cookies—whether you prefer them chewy or crispy, loaded with chocolate or with a hint of nuts—makes the homemade experience even more appealing.
In this article, readers can expect a comprehensive exploration of chocolate chip cookies. From understanding their origins and the key ingredients that contribute to their deliciousness to a detailed step-by-step guide for perfecting your own batch, we’ve got everything you need to embark on your baking adventure. You’ll also discover tips for achieving the ideal texture and flavor, ensuring your cookies are not just good but unforgettable.
Understanding the Basics of Chocolate Chip Cookies
The Origins of Chocolate Chip Cookies
As previously mentioned, the chocolate chip cookie was born in the 1930s at the Toll House Inn. Ruth Wakefield’s initial recipe was a simple blend of basic ingredients that transformed into a delightful treat with the addition of chocolate. The cookies gained immense popularity, leading to the publication of the recipe in a Boston newspaper, and eventually, the Nestlé company reached out to Wakefield, resulting in the inclusion of her recipe on their semi-sweet chocolate package. This partnership not only popularized the cookie but also made Nestlé Toll House chocolate chips a household name.
Why Chocolate Chip Cookies are a Classic Favorite
The chocolate chip cookie has remained a classic favorite for several reasons. Firstly, its versatility allows bakers to experiment with various ingredients and flavors, catering to different palates. Secondly, the combination of buttery dough and melting chocolate creates a harmonious contrast of textures—crisp edges with a soft, gooey center. Lastly, the nostalgia associated with homemade cookies often evokes fond memories of family gatherings and childhood, making them a go-to comfort food for many.
Key Ingredients that Make a Great Cookie
To create the perfect chocolate chip cookie, understanding the role of each ingredient is essential. The balance of components, from the flour to the chocolate chips, plays a pivotal role in the texture and flavor of your cookies. Let’s delve into the essential ingredients that will elevate your cookies from good to great.
Essential Ingredients for Your Chocolate Chip Cookies
Flour: Choosing the Right Type
Flour is the foundation of any cookie recipe, and selecting the right type is crucial. All-purpose flour is the most commonly used because it provides a good balance of protein content, which helps create structure and chewiness in the cookie. However, for a more tender cookie, some bakers may opt for cake flour or a blend of all-purpose and cake flour. This can yield a softer, lighter texture, which is particularly appealing to those who prefer a chewy cookie.
Sugars: The Role of Brown and White Sugar
Sugar not only sweetens your cookies but also affects their texture. Brown sugar, which contains molasses, adds moisture and a rich caramel flavor, helping to create a chewy consistency. White sugar, on the other hand, promotes spreading and contributes to a crispier texture. A combination of both sugars in your recipe allows you to achieve a balance that enhances both flavor and texture, resulting in cookies that are tender yet slightly crisp.
Butter: Salted vs. Unsalted
Butter is another key ingredient that greatly influences the flavor and texture of your chocolate chip cookies. While both salted and unsalted butter can be used, unsalted butter is generally preferred in baking as it allows for better control over the salt content in your cookies. Always ensure your butter is at room temperature for optimal creaming with sugars, which is essential for achieving that perfect cookie texture.
Eggs: Freshness and Temperature Considerations
Eggs serve multiple purposes in cookie recipes, providing moisture, richness, and acting as a binding agent. For the best results, it’s important to use fresh eggs at room temperature, as this helps them to incorporate more easily into the dough. If you forget to take them out in advance, a quick soak in warm water for about 10-15 minutes can help bring them to the desired temperature.
Baking Soda vs. Baking Powder: Understanding the Difference
Baking soda and baking powder are both leavening agents, but they function differently. Baking soda is a single-acting leavening agent that requires an acid to activate, such as brown sugar or chocolate. In contrast, baking powder contains both an acid and a base, allowing it to work without additional acidic components. Most chocolate chip cookie recipes call for baking soda, as it helps achieve a chewy texture and a slight rise in the cookies, keeping them soft and tender.
Chocolate Chips: Types and Quality Considerations
When it comes to chocolate chips, quality matters. There are various types available including semi-sweet, milk chocolate, dark chocolate, and even white chocolate. Semi-sweet is the classic choice for chocolate chip cookies, offering a perfect balance of sweetness and rich chocolate flavor. When selecting chocolate chips, opt for high-quality brands that use real cocoa solids, as this will significantly enhance the overall taste of your cookies.
Optional Add-Ins: Nuts, Oatmeal, and More
While chocolate chips are the star of the show, feel free to play around with optional add-ins to create your personalized cookie masterpiece. Chopped nuts, like walnuts or pecans, can add a delightful crunch and additional flavor. For a heartier texture, consider incorporating rolled oats, which not only provide a chewy bite but also lend a wholesome touch to your cookies. Dried fruits, such as cranberries or raisins, can introduce a tartness that balances the sweetness of the chocolate.
Step-by-Step Instructions for Perfect Chocolate Chip Cookies
With a clear understanding of the ingredients, it’s time to embark on the baking journey. Below are the essential steps to guide you through the process of making delicious chocolate chip cookies from scratch.
Preparing Your Kitchen: Tools and Equipment Needed
Before diving into the recipe, ensure you have the necessary tools and equipment at hand. Here’s what you’ll need:
– Mixing bowls (preferably glass or stainless steel)
– Measuring cups and spoons
– A hand mixer or stand mixer
– Rubber spatula
– Baking sheets lined with parchment paper or silicone mats
– Cookie scoop or tablespoon for portioning dough
– Cooling rack
Having everything organized will streamline the baking process and enhance your overall experience.
Mixing the Dry Ingredients: Flour, Baking Soda, and Salt
Start by whisking together the dry ingredients in a medium bowl. Combine the all-purpose flour, baking soda, and salt, ensuring they are evenly blended. This step is crucial as it evenly distributes the leavening agents and prevents clumping, which can result in uneven baking.
Creaming the Butter and Sugars: The Science Behind This Step
In a large mixing bowl, use a hand mixer or stand mixer to cream the softened butter, brown sugar, and granulated sugar together. Beat the mixture on medium speed until it becomes light and fluffy, about 2-3 minutes. This process incorporates air into the butter, which contributes to the cookie’s rise and texture. Pay attention to the consistency; a well-creamed mixture should be pale and fluffy, indicating that it has been adequately aerated.
Incorporating Eggs: The Right Way to Mix
Once the butter and sugars are creamed, add the eggs one at a time, mixing on low speed until just combined after each addition. This gradual incorporation helps maintain the airiness of the mixture while ensuring that the eggs are fully incorporated without over-mixing. At this stage, you can also add a splash of vanilla extract, which enhances the overall flavor profile of your cookies.
Adding the Chocolate Chips: How to Fold Them In Without Overmixing
Now it’s time to fold in the dry ingredients and chocolate chips. Begin by adding the flour mixture to the wet ingredients in three parts, mixing on low speed until just combined after each addition. Be careful not to overmix, as this can lead to tough cookies. Once the flour is incorporated, gently fold in the chocolate chips with a rubber spatula, ensuring they are evenly distributed throughout the dough.
Chilling the Dough: Why This Step is Crucial for Texture
For the best results, it’s recommended to chill the cookie dough for at least 30 minutes. Chilling firms up the butter, which helps the cookies maintain their shape while baking. This step also allows the flavors to meld and deepens the overall taste of the cookies. If you’re short on time, you can skip this step, but the texture may be slightly less desirable.
With these steps, you are well on your way to creating a batch of irresistible homemade chocolate chip cookies. Stay tuned for the final steps of baking your cookies to perfection, ensuring that each bite is a delightful experience!
Preheating Your Oven: The Right Temperature for Optimal Baking
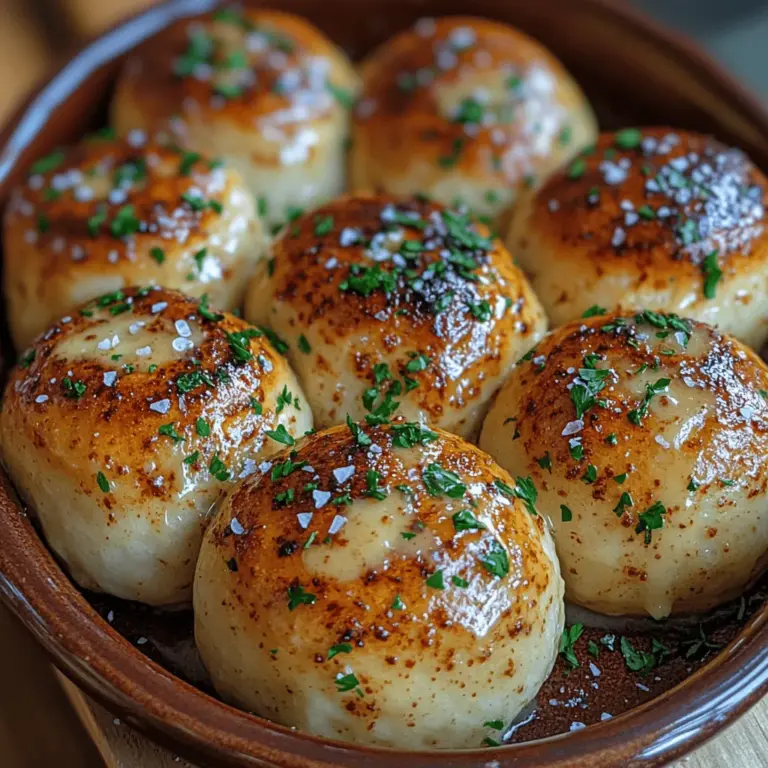
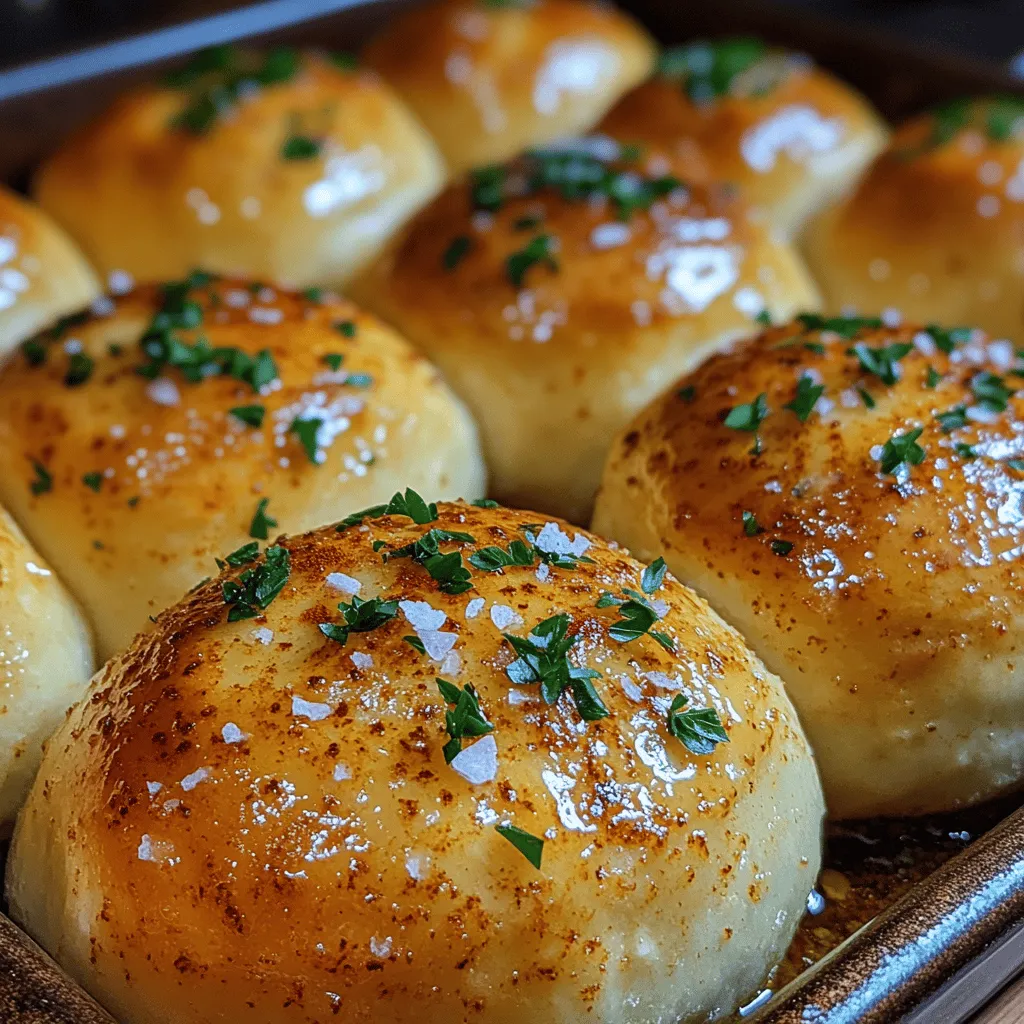
Before you embark on the delightful journey of baking Golden Garlic Butter Dinner Rolls, preheating your oven is crucial. Preheating ensures that your rolls rise beautifully and bake evenly. For this recipe, set your oven to 375°F (190°C). This temperature is ideal for achieving that perfect golden crust while keeping the insides soft and fluffy. Allow the oven to preheat fully before placing your rolls inside, which typically takes about 10-15 minutes.
Baking Sheets and Parchment Paper: Choosing the Right Tools
Equipping yourself with the right tools can make a significant difference in your baking experience. For Golden Garlic Butter Dinner Rolls, use a standard baking sheet or a half-sheet pan. Lining the baking sheet with parchment paper is highly recommended, as it prevents the rolls from sticking and allows for easier cleanup. Parchment paper also aids in achieving an even bake. If you don’t have parchment paper, lightly greasing the baking sheet with butter or cooking spray will also work, but be mindful of the potential for sticking.
How Long to Bake: Timing for Chewy vs. Crispy Rolls
The baking time for your Golden Garlic Butter Dinner Rolls is key to achieving the desired texture. Generally, you should bake your rolls for about 18-20 minutes. For soft and chewy rolls, aim for the lower end of that range. If you prefer a slightly firmer crust, leave them in for the full 20 minutes. Keep an eye on them as they bake, as ovens can vary. The rolls should be golden brown on top and puffed up, indicating they are cooked through.
Signs That Your Rolls Are Done: What to Look For
Knowing when your Golden Garlic Butter Dinner Rolls are done can be tricky, but there are a few indicators to watch for:
1. Color: The tops should be a rich golden brown.
2. Texture: Gently tap the top of a roll; it should feel firm and spring back slightly.
3. Internal Temperature: For the best results, use an instant-read thermometer. The internal temperature should reach around 190°F (88°C) to ensure they are fully baked.
Cooling and Storing Your Golden Garlic Butter Dinner Rolls
Proper cooling is essential to maintain the texture and flavor of your dinner rolls. As soon as you remove the rolls from the oven, transfer them to a wire rack. This allows air to circulate around them, preventing the bottoms from becoming soggy. Let them cool for about 10-15 minutes before serving; this helps the flavors to settle and the rolls to firm up slightly.
Best Practices for Storing Rolls: Keeping Them Fresh
To store your Golden Garlic Butter Dinner Rolls, place them in an airtight container at room temperature. They will stay fresh for up to 2 days. If you want to keep them longer, consider refrigerating them in an airtight container, but be aware that refrigeration can dry them out.
Freezing Rolls: How to Do It Right
If you want to extend the shelf life of your dinner rolls even further, freezing is an excellent option. Allow the rolls to cool completely before freezing them. Wrap each roll individually in plastic wrap and then place them in a freezer-safe bag or container. This method helps prevent freezer burn and maintains their freshness. When you’re ready to enjoy them, thaw the rolls at room temperature or reheat them in the oven at 350°F (175°C) for about 10-12 minutes.
Variations on the Classic Garlic Butter Dinner Rolls
While Golden Garlic Butter Dinner Rolls are delicious on their own, there are plenty of variations you can try to add a personal twist.
Herb-Infused Rolls: Adding Fresh Herbs
Incorporate fresh herbs like rosemary or thyme into the dough for an aromatic twist. Simply chop the herbs finely and mix them in with the dry ingredients. This will infuse the rolls with a delightful herbaceous flavor that pairs beautifully with the garlic butter.
Cheese-Stuffed Rolls: A Cheesy Delight
For a cheesy variation, consider stuffing the rolls with shredded cheese before baking. Simply flatten the dough, place a small amount of cheese in the center, and fold the dough over to seal it. This creates a gooey, cheesy surprise in each bite.
Whole Wheat Rolls: A Healthier Option
For a healthier alternative, substitute half of the all-purpose flour with whole wheat flour. This will give the rolls a nuttier flavor and a denser texture while still maintaining their delightful softness.
Troubleshooting Common Roll Issues
Even the most experienced bakers encounter issues from time to time. Here are some common problems with dinner rolls and how to resolve them.
Why Are My Rolls Too Dense?
If your rolls are denser than expected, it could be due to under-kneading the dough. Ensure you knead the dough until it becomes smooth and elastic, usually about 8-10 minutes. Additionally, make sure your yeast is fresh and active; expired yeast can lead to insufficient rise.
Rolls That Are Too Dry
If your rolls turn out too dry, it could be due to overbaking. Keep an eye on the rolls during the last few minutes of baking to prevent this. Also, make sure to use the correct measurements of flour; too much flour can lead to a dry texture.
The Mystery of Rolls Spreading Too Much
If your rolls spread out too much instead of rising, it might be due to the dough being too warm when placed in the oven. Ensure that your dough has rested and risen properly before baking. Additionally, avoid overworking the dough, which can lead to a loss of structure.
Serving Suggestions and Pairings
Golden Garlic Butter Dinner Rolls are versatile and can be served in numerous ways. Here are some delightful serving suggestions:
Complimenting Your Rolls with Beverages
These rolls pair beautifully with a wide range of beverages. A classic choice is a glass of cold milk, which enhances the rich buttery flavor. For a more sophisticated pairing, consider serving them with a robust red wine or a light white wine, which complements the garlic notes.
Creative Ways to Serve Rolls
Consider transforming your rolls into gourmet creations. Slice them horizontally and fill them with your favorite deli meats, cheeses, and fresh vegetables for a delicious sandwich. Alternatively, use them as a base for sliders, topped with mini patties, cheese, and your favorite condiments.
Using Rolls in Other Recipes
Golden Garlic Butter Dinner Rolls can also be used creatively in other dishes. For example, they make excellent croutons when cubed and toasted in the oven. You can also use them for bread pudding or as a base for savory bread puddings, adding ingredients like spinach and cheese for a hearty side dish.
Conclusion
Baking Golden Garlic Butter Dinner Rolls at home brings immense joy and satisfaction. The aroma that fills your kitchen as they bake is simply irresistible, and enjoying warm, freshly made rolls with family and friends is a cherished experience.
Experimenting with various ingredients and techniques allows you to make this recipe your own, whether you choose to stick with the classic version or try out some fun variations. The beauty of homemade rolls lies not just in their deliciousness but also in the love and creativity you put into them. So roll up your sleeves, gather your ingredients, and delight in the comforting process of baking these delightful dinner rolls!
