Introduction
Understanding the allure of sweet treats is essential, and nothing captures that magic quite like chocolate fudge. This Heavenly 3-Ingredient Chocolate Fudge recipe stands out for its simplicity and rich flavor, making it a perfect dessert for any occasion. Whether you are an experienced baker or a novice in the kitchen, this recipe will guide you through creating a luscious chocolate delight that is sure to impress. With just three ingredients, you can whip up a batch of chocolate fudge that is not only delicious but also incredibly satisfying to make and share.
The Allure of Chocolate Fudge
Exploring the History of Chocolate Fudge
Chocolate fudge has a storied history that dates back to the late 19th century, originating in the United States. The term “fudge” is believed to have emerged from the word “fudged,” which refers to a mistake or a mishap. Interestingly, the first known recipe for fudge was discovered in a letter written by a Vassar College student in 1886, who described making a batch of fudge as a sweet error in her candy-making endeavors. This delightful confection quickly gained popularity, especially during the turn of the century, when it became a common treat at fairs and candy shops.
Over the years, fudge recipes have evolved, incorporating various ingredients and flavor profiles. From traditional chocolate to nutty variations, fudge has become a beloved treat that sparks joy in many hearts. Its creamy texture and rich flavor make it a versatile dessert that can be enjoyed on its own, used in baking, or offered as a gift. The enduring appeal of chocolate fudge lies not only in its taste but also in the nostalgia and comfort it evokes, making it a timeless classic that continues to delight generations.
The Benefits of Making Fudge at Home
One of the most compelling reasons to make fudge at home is its cost-effectiveness. Store-bought fudge can be expensive, especially when you’re looking for high-quality options. By making fudge at home, you can create a delectable treat without breaking the bank. Additionally, homemade fudge allows you to control the ingredients, ensuring that you use only the best quality chocolate and other components.
Another significant advantage of making fudge at home is the opportunity for customization. Dietary preferences and restrictions can often be a challenge when selecting store-bought sweets. However, with this simple 3-ingredient fudge recipe, you can easily tailor the ingredients to suit your needs. Whether you prefer dark chocolate, are looking to reduce sugar, or want to add a nutty crunch, the possibilities are endless. This flexibility makes homemade fudge an ideal choice for various occasions, from birthday parties to holiday gatherings.
Finally, there is an undeniable joy that comes from creating and sharing homemade sweets. The process of making fudge can be a delightful experience, whether you’re preparing it for yourself or as a gift for friends and family. The smiles and satisfaction that come from sharing a delicious treat made with love are unmatched.
Ingredients Overview
Highlighting the Three Key Ingredients
Before diving into the preparation of this heavenly fudge, let’s take a closer look at the three key ingredients that make it so delicious.
1. Semi-Sweet Chocolate Chips: The foundation of this fudge is the semi-sweet chocolate chips, which provide a rich chocolate flavor and smooth texture. Semi-sweet chocolate strikes a perfect balance between sweetness and cocoa intensity, making it an ideal choice for fudge. When melted, these chips create a luscious base that binds the other ingredients together, resulting in a creamy and satisfying confection.
2. Sweetened Condensed Milk: This ingredient is the secret behind the fudge’s creaminess and sweetness. Sweetened condensed milk is a thick, syrupy product made from milk and sugar, which adds moisture and a velvety texture to the fudge. The high sugar content helps solidify the fudge as it cools, ensuring a perfect texture that melts in your mouth.
3. Vanilla Extract: While the first two ingredients provide the primary flavors, vanilla extract enhances the overall chocolate profile. A splash of vanilla adds depth and complexity to the fudge, making the chocolate flavor more pronounced. It’s an essential ingredient that transforms a simple recipe into a truly indulgent treat.
Optional Ingredient Variations
While the basic 3-ingredient fudge is incredibly satisfying on its own, there are numerous ways to customize the recipe to suit your taste preferences. Here are a few variations to consider:
– Different Types of Chocolate: While semi-sweet chocolate chips are the standard choice, you can experiment with other types of chocolate. Dark chocolate will yield a more intense flavor, while milk chocolate will result in a sweeter, creamier fudge. White chocolate can also be used for a unique twist, providing a different flavor profile altogether.
– Add-Ins for a Personal Touch: Consider adding nuts, dried fruits, or flavored extracts for an extra layer of flavor. Chopped walnuts or pecans can introduce a delightful crunch, while dried cranberries or cherries can add a hint of tartness. Experimenting with flavored extracts such as almond or orange can also elevate the fudge to new heights.
By incorporating these variations, you can create a personalized fudge experience that caters to your unique tastes and preferences.
Step-by-Step Instructions
Preparing the Pan for Baking
The first step in creating your Heavenly 3-Ingredient Chocolate Fudge is preparing your baking pan. This is a crucial step that ensures easy removal of the fudge once it’s set. Here’s how to do it:
1. Choose the Right Pan: For this recipe, a 9×9-inch square baking dish is ideal. This size allows the fudge to set properly without being too thick or thin.
2. Line with Parchment Paper: To prevent the fudge from sticking, line the bottom and sides of the baking dish with parchment paper. Leave a bit of an overhang on the sides, which will make it easier to lift the fudge out of the pan once it’s set. If you don’t have parchment paper, you can also grease the pan with butter or cooking spray, but parchment is highly recommended for the best results.
3. Grease the Paper: For added assurance against sticking, lightly grease the parchment paper with a bit of butter or oil. This will create a non-stick surface for the fudge to slide out easily once it’s cooled and set.
With your pan prepped, you’re now ready to move on to the next steps in creating your Heavenly 3-Ingredient Chocolate Fudge. In the following sections, we will walk through the melting process and how to combine the ingredients for a deliciously indulgent treat.
Stay tuned for the next part of this recipe, where we will continue with the detailed instructions and tips for achieving the perfect fudge every time.
Tips for Ensuring Even Distribution of Fudge in the Pan
Achieving a perfectly set fudge requires attention to detail, particularly when it comes to the distribution of the mixture in the pan. Here are a few tips to ensure that your fudge spreads evenly and sets uniformly.
1. Use the Right Pan: Select a pan that is the appropriate size for your fudge. A square or rectangular pan works best for cutting into neat squares. If the pan is too large, the fudge may be too thin; if it’s too small, it may take longer to set.
2. Line the Pan: Always line your pan with parchment paper or aluminum foil, allowing some overhang on the edges. This will make it easier to remove the fudge once it has set, and it ensures that the fudge does not stick to the sides.
3. Gentle Tapping: After pouring the fudge mixture into the lined pan, gently tap the sides of the pan on the countertop. This helps release any trapped air bubbles and encourages the fudge to settle evenly.
Melting the Chocolate and Condensed Milk Mixture
Melting chocolate is a delicate process that can easily go wrong if not handled properly. Here are some effective techniques to ensure success:
1. Double Boiler Method: The classic method for melting chocolate involves using a double boiler. Place a heatproof bowl over a pot of simmering water, ensuring the bottom of the bowl doesn’t touch the water. Add your chocolate and condensed milk to the bowl, stirring gently as the chocolate melts.
2. Microwave Melting: If you prefer a quicker method, you can use the microwave. Place the chocolate and condensed milk in a microwave-safe bowl. Heat in 30-second intervals, stirring in between, until the mixture is fully melted and smooth. This method requires careful attention, as chocolate can burn quickly in the microwave.
3. Continuous Stirring: Regardless of your melting method, continuous stirring is crucial. This not only helps to achieve a smooth consistency but also prevents the chocolate from seizing or burning. Stir until the mixture is completely combined and glossy.
Incorporating the Flavor
Once your chocolate and condensed milk mixture is smooth, it’s time to enhance its flavor.
1. Adding Vanilla Extract: A splash of pure vanilla extract elevates the overall taste of your fudge. It adds depth and a hint of warmth that complements the rich chocolate beautifully. Stir in about a teaspoon of vanilla extract after melting the mixture for the best results.
2. Flavor Variations: If you’re feeling adventurous, consider experimenting with different flavorings. Almond extract provides a delightful nutty essence, while peppermint extract can offer a refreshing twist, especially around the holidays. Just be cautious with the amounts; a little goes a long way!
Pouring and Setting the Fudge
The next step is to pour the melted fudge mixture into the prepared pan and set it.
1. Spreading the Mixture: Pour the fudgy goodness into the lined pan and use a spatula to spread it evenly. This is where the previous tips come into play; ensure the mixture reaches all corners of the pan.
2. Removing Air Bubbles: After spreading, gently lift the pan and tap it on the countertop again. This action helps to eliminate any air bubbles that may have formed, ensuring a smooth, dense texture.
3. Chilling to Set: Place the pan in the refrigerator for at least 2-3 hours, or until the fudge is firm. Avoid placing it in the freezer, as this can cause the fudge to harden too quickly and alter its texture.
Cutting and Serving Suggestions
Once your fudge has set, it’s time to cut and serve it in style.
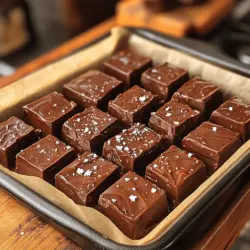
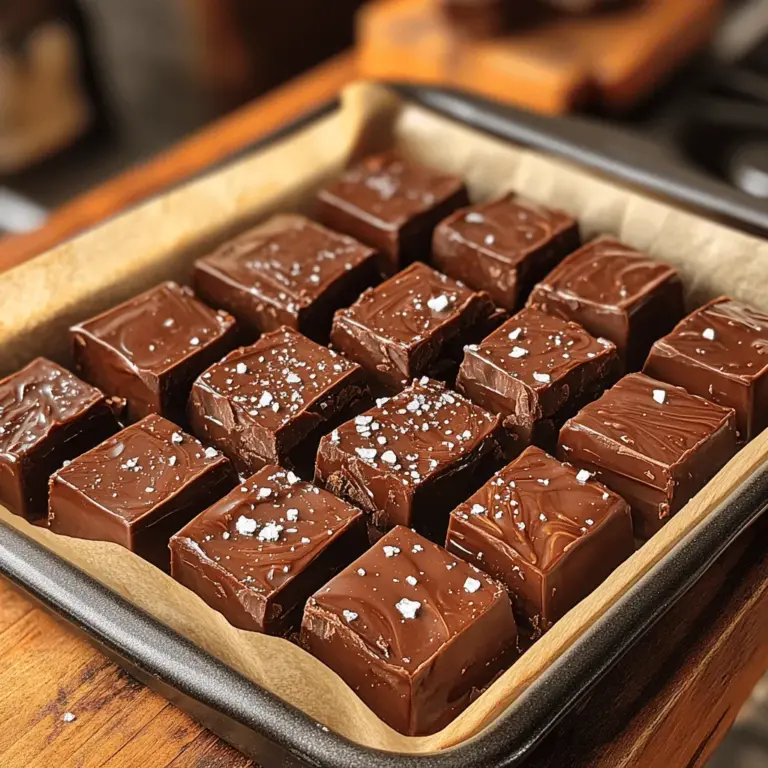
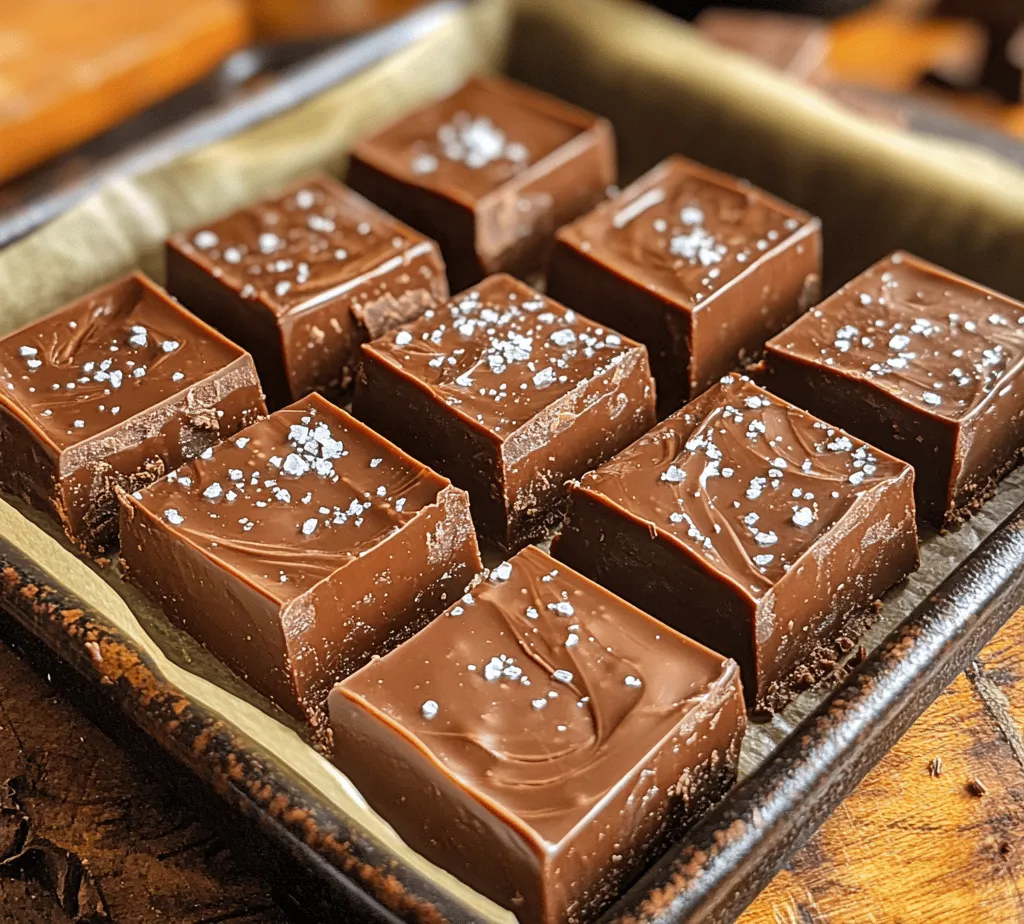
1. Cutting Techniques: To cut perfect squares, first, remove the fudge from the pan using the parchment overhang. Place it on a cutting board and use a sharp knife to slice it into squares. For cleaner cuts, warm the knife under hot water and dry it before slicing. This prevents the fudge from sticking to the knife.
2. Creative Serving Ideas: Chocolate fudge can be enjoyed in various ways. Serve it plain for a rich and decadent treat, or pair it with a scoop of vanilla ice cream for a delightful dessert sundae. It also complements coffee beautifully, making it an excellent addition to a dessert platter for gatherings or celebrations.
Nutritional Information
Understanding the nutritional content of your homemade chocolate fudge can help you enjoy it mindfully.
1. Calories and Fats: Each piece of fudge typically contains around 100 calories, depending on the ingredients used and portion size. The rich chocolate and condensed milk contribute to the fat content, which is primarily from cocoa butter and dairy.
2. Sugars: The sweetness in fudge comes from the condensed milk and added sugars in the chocolate. Each piece may contain about 10-12 grams of sugar, making it an indulgent treat that should be consumed in moderation.
3. Indulgent Yet Moderate: While this fudge is undeniably rich, it can be enjoyed as an occasional treat. Small portions can satisfy your sweet cravings without overindulgence.
Storage and Shelf Life
To keep your chocolate fudge fresh and delicious, proper storage is essential.
1. Airtight Containers: Store your fudge in an airtight container at room temperature for optimal freshness. If you prefer it chilled, you can keep it in the refrigerator, but remember to let it come to room temperature before serving for the best flavor and texture.
2. Shelf Life: Homemade chocolate fudge can last up to two weeks at room temperature and slightly longer in the refrigerator. If you want to extend its shelf life, consider freezing it. Wrapped tightly in plastic wrap and then placed in an airtight container, the fudge can last for up to three months in the freezer.
Conclusion
This Heavenly 3-Ingredient Chocolate Fudge recipe offers a delightful way to satisfy your sweet tooth with minimal effort. Its rich flavor and smooth texture are a testament to the beauty of simple ingredients coming together. Whether you serve it at a gathering or enjoy it as a treat at home, this fudge is sure to bring joy to chocolate lovers everywhere. Embrace the pleasure of creating and sharing this easy, delectable confection, and experience the sweetness of homemade desserts. The simplicity of this recipe invites you to explore the world of chocolate fudge, and with a few tips and tricks, you can master the art of fudge-making and impress your friends and family with your culinary skills.