Introduction
As Easter approaches, families around the world begin to prepare for one of the most cherished culinary traditions: the baking of Italian Easter Bread. This delightful bread, often braided and adorned with colorful decorations, is deeply intertwined with Italian culture and symbolizes the joy of new beginnings, rebirth, and family gatherings. For many, the process of baking this bread is not just about the end product; it’s a cherished ritual that brings loved ones together in the kitchen, creating lasting memories that resonate long after the holiday has passed.
Italian Easter Bread embodies rich flavors and a festive presentation that makes it a centerpiece for any Easter celebration. Its soft, fluffy texture combined with the sweet aroma of vanilla and citrus zests captures the essence of spring. Traditionally enjoyed during Easter brunch, this bread not only satisfies the palate but also serves as a beautiful representation of the holiday’s spirit. The addition of dyed eggs, a customary element in the bread’s design, symbolizes new life and serves as a reminder of the resurrection during this holy season.
Sharing this recipe allows families to connect with their heritage and pass down culinary traditions that have been enjoyed for generations. Whether you are Italian by heritage or simply love to embrace diverse culinary practices, making Festive Italian Easter Bread is an excellent way to celebrate the season, bringing warmth and joy into your home.
Understanding the Ingredients
To create the perfect Festive Italian Easter Bread, understanding each ingredient’s role in the recipe is essential. Each component contributes to the overall flavor, texture, and symbolic meaning of this delightful bread.
All-Purpose Flour: The Foundation of the Bread
All-purpose flour serves as the backbone of Italian Easter Bread. Its moderate protein content allows for the formation of gluten, which gives the bread its structure and chewiness. When selecting flour, it’s important to ensure it is fresh and of good quality, as this will directly impact the bread’s texture.
Sugar: Adding Sweetness and Aiding Fermentation
Sugar is not only responsible for the bread’s sweetness but also plays a crucial role in fermentation. It acts as food for the yeast, helping it to thrive and produce carbon dioxide, which causes the dough to rise. The sugar also contributes to the browning of the crust during baking, enhancing the overall appeal of the bread.
Active Dry Yeast: Essential for Leavening and Texture
Yeast is the magic ingredient that transforms a simple dough into a light, airy bread. Active dry yeast must be activated before use, allowing it to awaken and begin the fermentation process. This is what produces the delightful rise and fluffy texture that characterizes Italian Easter Bread. Ensuring that the yeast is fresh and properly activated is key to achieving the desired results.
Salt: Enhancing Flavor and Controlling Yeast Activity
Salt is a vital ingredient in bread-making, not only for its ability to enhance flavor but also for its role in regulating yeast activity. It strengthens gluten structure, which helps the bread maintain its shape and texture. However, it’s important not to add salt directly to the yeast, as this can inhibit its growth. Instead, it should be mixed with the flour before incorporating the yeast into the dough.
Whole Milk: Providing Moisture and Richness
Whole milk adds richness and moisture to the dough, resulting in a tender and flavorful bread. The fats in the milk also contribute to the softness of the crumb, making each bite delightful. Using whole milk is recommended for the best results, but you can substitute with a non-dairy alternative if needed.
Unsalted Butter: Contributing to Tenderness and Flavor
Unsalted butter enriches the dough, adding flavor and ensuring tenderness. It creates a softer texture by coating the flour particles, which inhibits gluten formation. When using butter, ensure it is at room temperature for easy incorporation into the dough.
Eggs: Enriching the Dough and Aiding in Structure
Eggs play a dual role in Italian Easter Bread. They enrich the dough, contributing to its flavor and color, while also providing structure and stability. The proteins in the eggs help bind the ingredients together, ensuring a cohesive dough that rises beautifully.
Vanilla Extract: Adding Depth to the Flavor Profile
A splash of vanilla extract elevates the flavor profile of the bread, adding a warm, aromatic quality. It complements the sweetness of the dough and pairs beautifully with the citrus notes, creating a harmonious blend of flavors.
Citrus Zests (Lemon and Orange): Infusing Freshness and Brightness
Citrus zests are essential for adding a burst of freshness and brightness to Italian Easter Bread. The oils in the zests release vibrant flavors that enhance the overall taste, making each bite a celebration of spring. Lemon and orange are commonly used, but feel free to experiment with your favorite citrus varieties.
Colored Sprinkles: A Festive Touch for Decoration
No Italian Easter Bread is complete without a sprinkle of colored decorations. Colored sprinkles, often used in the final glaze, add a playful and festive element to the bread, making it visually appealing and perfect for the holiday table.
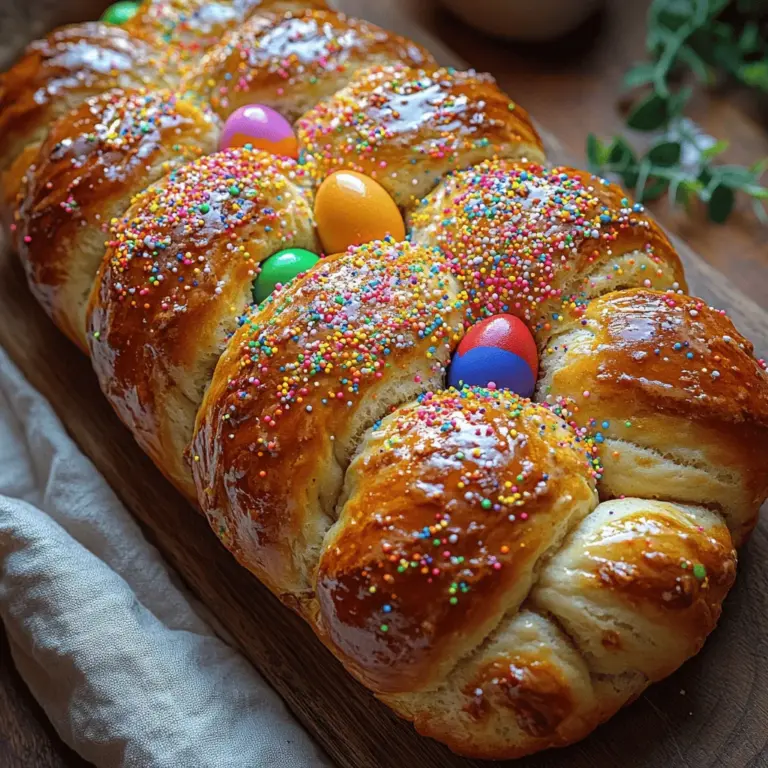
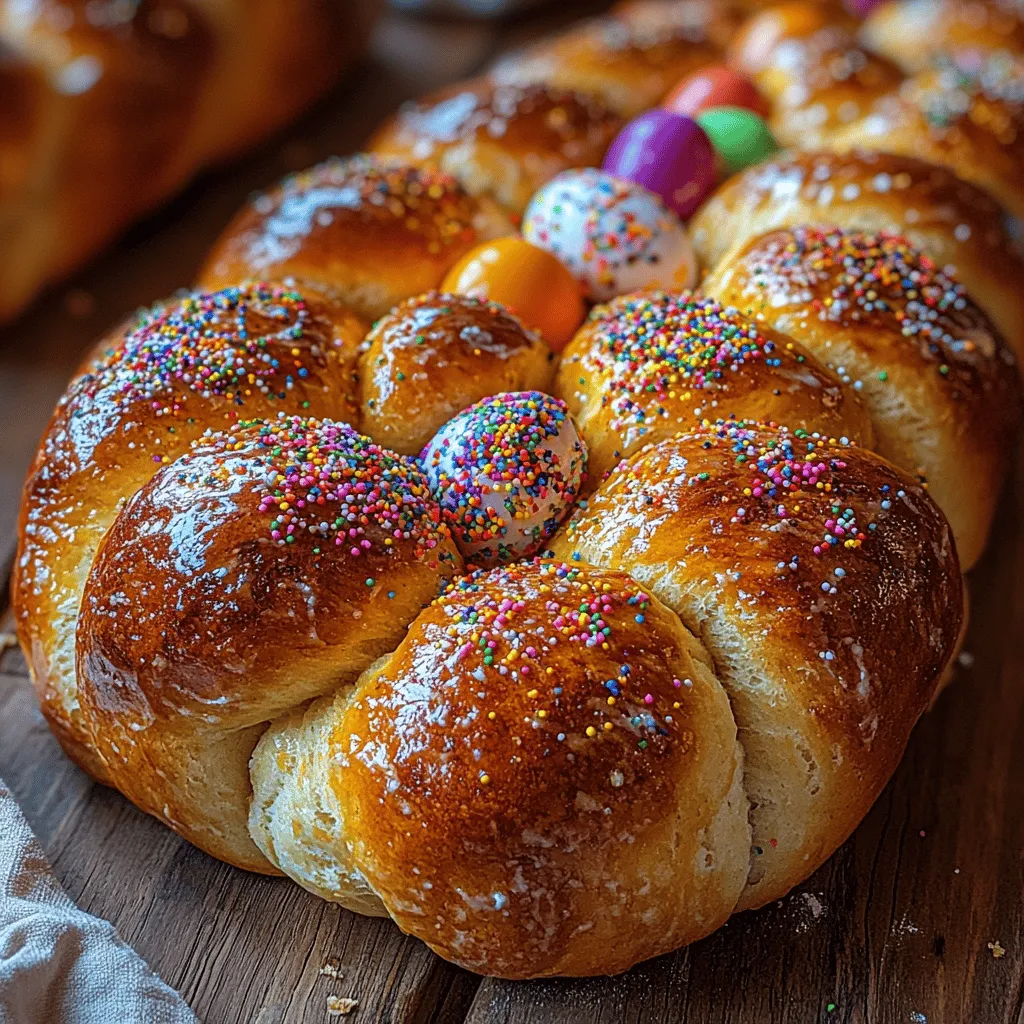
Dyed Eggs: A Traditional Element Symbolizing New Life and Rebirth
The inclusion of dyed eggs is a hallmark of Italian Easter Bread. Traditionally placed in the braid or nestled on top, these eggs symbolize new life and the resurrection of Christ. As the bread bakes, the eggs become a beautiful part of the presentation — a vibrant reminder of the season’s significance.
Step-by-Step Guide to Making Italian Easter Bread
Now that we have explored the significance and ingredients that make up Festive Italian Easter Bread, it’s time to dive into the step-by-step process of creating this delicious treat. Each step is critical to achieving the perfect loaf, so pay careful attention to the details.
Activating the Yeast
The first step in making Italian Easter Bread is activating the yeast. This process is essential for ensuring that the bread rises properly. Begin by measuring out the required amount of active dry yeast and place it in a small bowl. Add a teaspoon of sugar—this will feed the yeast and encourage it to grow. Next, warm a half-cup of whole milk to around 110°F (43°C). It should feel warm to the touch but not hot, as excessive heat can kill the yeast. Pour the warm milk over the yeast mixture, stirring gently to combine. Allow this mixture to sit for about 5 to 10 minutes, until it becomes frothy and bubbly. This indicates that the yeast is alive and ready to work its magic.
Mixing Dry Ingredients
While the yeast is activating, it’s time to prepare the dry ingredients. In a large mixing bowl, combine 4 cups of all-purpose flour, 1/4 cup of sugar, and 1 teaspoon of salt. Use a whisk to mix these dry ingredients thoroughly, ensuring that the sugar and salt are evenly distributed throughout the flour. This step is crucial for achieving a uniform texture in your bread. If you wish to enhance the flavor further, consider adding a teaspoon of lemon or orange zest at this stage.
Combining Wet Ingredients
Once your yeast mixture is frothy, it’s time to combine the wet ingredients. In a separate bowl, beat two large eggs and add them to the yeast mixture. Then, incorporate 1/4 cup of unsalted butter, melted and cooled slightly. Follow this with the addition of 1 teaspoon of vanilla extract and the zests of one lemon and one orange. Stir the mixture until well combined, ensuring that all the ingredients are well incorporated and the mixture is smooth.
This combination of wet ingredients will not only add flavor to the bread but also contribute to its moisture and richness. When the wet ingredients are fully blended, it’s time to bring everything together.
Bringing It All Together
Now, gradually add the dry ingredients to the wet mixture. Start by adding about half of the flour mixture to the bowl with the wet ingredients, stirring gently with a wooden spoon or spatula. Once incorporated, continue to add the remaining flour until a shaggy dough begins to form. At this point, you may need to switch to your hands to knead the dough.
Kneading is a vital step in developing the gluten, which gives the bread its structure. Turn the dough out onto a lightly floured surface and knead for about 8 to 10 minutes, or until the dough is smooth and elastic. If the dough feels too sticky, you can sprinkle in a bit more flour, but be cautious not to add too much, as this may lead to a dry bread.
With the dough properly kneaded, it’s ready for the next step in the process, leading to the creation of a delightful Easter bread that will surely become a beloved tradition in your home.
Stay tuned for the next part of this article, where we will guide you through shaping, proofing, and baking your Festive Italian Easter Bread to perfection.
Forming the Dough
Creating the perfect dough is the cornerstone of making delicious Italian Easter Bread. Kneading is essential, as it develops gluten, which provides the bread with its structure and texture. Begin by mixing your ingredients until they are just combined. Once your flour, sugar, yeast, salt, and liquids are mixed, turn your dough out onto a lightly floured surface. Knead the dough for approximately 8 to 10 minutes until it becomes smooth and elastic. The right consistency should be soft yet slightly tacky, allowing it to spring back when poked. If you find the dough too sticky, feel free to add a bit more flour, but avoid overdoing it to maintain the bread’s lightness.
First Rise
After kneading your dough to perfection, it’s time for the first rise—a crucial step that allows the yeast to work its magic. Place the dough in a lightly oiled bowl, turning it once to coat the surface. Cover the bowl with a clean kitchen towel or plastic wrap to keep the moisture in. The ideal environment for the dough to rise is a warm, draft-free area. A temperature of around 75°F to 80°F is perfect. Let the dough rise until it doubles in size, which usually takes about 1 to 2 hours. To check if your dough has risen enough, gently press two fingers into it; if the indentations remain, it’s ready for the next step.
Shaping the Bread
Once your dough has completed its first rise, it’s time to shape it. This is where creativity can shine! Traditional Italian Easter Bread can be shaped in several ways, with braiding and wreath shapes being the most popular. For a braided loaf, divide the risen dough into three equal pieces, roll each piece into a long rope, and braid them together. Alternatively, if you prefer the wreath shape, roll the dough into a long rope and form it into a circle, pinching the ends together to secure. You can even create decorative touches, such as adding dyed eggs nestled within the design, which not only looks beautiful but also adds symbolic meaning.
Preparing for Second Rise
After shaping, it’s time for the second rise. Place your shaped bread on a baking sheet lined with parchment paper. If you’ve incorporated dyed eggs, gently nestle them into the braid or wreath, ensuring they are secure but not buried in the dough. Cover the bread loosely with a kitchen towel and allow it to rise again until it’s puffed up and has doubled in size, which will take about 30 to 45 minutes. This second rise is crucial as it enhances the bread’s light texture and allows the flavors to develop further.
Preheating the Oven
While your bread is rising, you should prepare your oven. Preheat it to 350°F (175°C), ensuring that it reaches the desired temperature before placing your bread inside. Proper temperature control is vital for achieving a beautifully baked loaf. An oven thermometer can help confirm that your oven is accurate; this ensures even baking and prevents the bread from becoming too dry or undercooked.
Applying Egg Wash
To give your Italian Easter Bread that characteristic glossy finish, an egg wash is essential. Just before baking, whisk together one egg with a tablespoon of water or milk. Gently brush this mixture over the surface of the bread using a pastry brush. This step not only enhances the appearance of the bread but also helps to create a slight crispness in the crust, contributing to the overall texture.
Baking
Now comes the moment of truth—baking your Italian Easter Bread! Place the baking sheet in the preheated oven and bake for 25 to 35 minutes, or until the bread is golden brown and sounds hollow when tapped on the bottom. Keep an eye on it during the last few minutes of baking; if the top begins to brown too quickly, you can cover it loosely with aluminum foil to prevent burning. If you’re unsure whether it’s done, use a digital thermometer—your bread should reach an internal temperature of about 190°F (88°C).
Cooling and Decorating
Once your bread is baked to perfection, remove it from the oven and allow it to cool on a wire rack. This step is crucial as it helps prevent a soggy bottom. After it’s cooled completely, you can add finishing touches. Some families like to drizzle a simple icing made with powdered sugar and milk over the top or sprinkle it with colored sugar for an extra festive touch. You may also want to keep the dyed eggs intact for decoration, as they symbolize new life and renewal during the Easter season.
Cultural Significance of Easter Bread in Italy
Italian Easter Bread is more than just a recipe; it is steeped in history and tradition. Originating from various regions in Italy, each area has its unique spin on this festive bread. In Sicily, for example, the bread often includes a hint of citrus zest, while in Naples, it might be enriched with a blend of spices. The significance of the shapes—typically a wreath or braided form—often symbolizes the cycle of life, with the use of eggs representing new beginnings and resurrection.
As families gather to celebrate Easter, this bread becomes a centerpiece of the table, uniting generations through shared recipes and stories. Many Italian families pass down the tradition of making Easter bread from one generation to the next, ensuring that the rich cultural heritage remains alive.
Celebrating Easter with Italian Easter Bread
Serving Italian Easter Bread can elevate your Easter celebrations. This delightful bread pairs beautifully with traditional Italian dishes such as lamb, roasted vegetables, or a fresh spring salad. It can also be enjoyed alongside a selection of cheeses and cured meats for a festive brunch. During family gatherings, the bread is often sliced and shared among loved ones, enhancing the sense of community and togetherness that this season embodies.
In modern festivities, consider incorporating Italian Easter Bread into your celebrations by hosting a bread-making party with family and friends. This not only fosters connection but also allows everyone to engage in the fun of creating something special together. You can even experiment with different flavor profiles or decorations, ensuring that each loaf is as unique as the family traditions it represents.
Nutritional Information
Before indulging, it’s essential to consider the nutritional profile of Italian Easter Bread. A standard serving (approximately 1 slice) contains roughly 200 calories, along with significant amounts of carbohydrates and protein, mainly due to the flour and eggs. While it is a delicious treat, those watching their sugar or carbohydrate intake should enjoy this bread in moderation.
For those interested in dietary modifications, there are options available. You can substitute traditional ingredients with alternatives such as plant-based milk and egg replacers to create a vegan version. This approach allows everyone to enjoy the flavors of this beloved bread while accommodating various dietary preferences.
Conclusion
Italian Easter Bread is a delightful way to celebrate the season of renewal, bringing together family, tradition, and culinary artistry. As you knead, shape, and bake, you’re not just creating a loaf of bread; you’re fostering connections with your heritage and loved ones. Embrace the joy of making this festive bread and share it with family and friends during your Easter celebrations. In doing so, you honor the rich tapestry of culture and tradition that makes this recipe not just a treat for the taste buds but a cherished symbol of love and togetherness. Enjoy the process, and let the aroma of freshly baked bread fill your home with warmth and happiness this Easter.
