Introduction
There’s something undeniably magical about homemade ice cream—it’s a delightful treat that evokes memories of summer days, family gatherings, and the simple pleasure of enjoying a cold dessert on a hot afternoon. While traditional ice cream recipes often require an ice cream maker and a fair amount of time, the “Creamy Dreamy No-Churn Vanilla Ice Cream” recipe brings the joy of making ice cream right into your kitchen without any of the fuss.
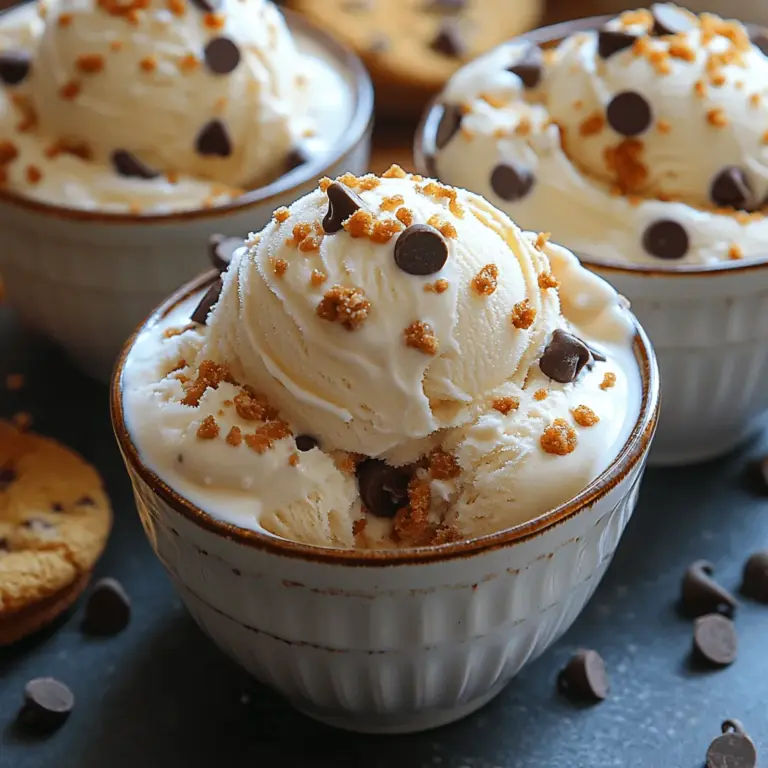
This no-churn ice cream recipe is not only easy to make but also incredibly versatile. Whether you’re looking for a classic vanilla flavor or want to get creative with mix-ins, this recipe can be adapted to suit your taste. Imagine scoops of creamy vanilla ice cream studded with chocolate chips, fresh berries, or crushed cookies—each bite is a little piece of heaven.
So, if you’ve ever dreamed of making your own ice cream without the hassle of special tools, you’re in for a treat. Let’s dive into the world of no-churn ice cream and discover how to create a luscious, creamy dessert that will impress friends and family alike.
Understanding No-Churn Ice Cream
No-churn ice cream is a revolutionary approach to making this beloved dessert, allowing anyone to enjoy homemade ice cream without the need for an ice cream maker. Instead of churning, this method relies on a simple combination of ingredients that, when whipped together, create a smooth and creamy texture.
Benefits of Making Ice Cream Without an Ice Cream Maker
Making no-churn ice cream comes with several advantages. First and foremost, it saves time and effort. You won’t have to worry about pre-freezing an ice cream bowl or monitoring the churning process. Just mix, pour, and freeze—that’s it!
Additionally, the no-churn method opens the door to endless possibilities. You can easily customize the flavors and textures to your liking without the constraints of a traditional recipe. This flexibility means you can experiment with various ingredients, making it fun and enjoyable for everyone involved.
Importance of the Whipping Process for Texture and Flavor
The key to achieving that creamy, dreamy texture in no-churn ice cream lies in the whipping process. Heavy whipping cream is whipped until it forms stiff peaks, which introduces air into the mixture. This aeration is crucial, as it gives the ice cream its light and fluffy texture. The whipped cream base is then folded into sweetened condensed milk, which not only adds sweetness but also contributes to the overall creaminess of the final product. Together, these elements create a rich and indulgent ice cream that rivals any store-bought version.
Ingredients Breakdown
To make the “Creamy Dreamy No-Churn Vanilla Ice Cream,” you will need just a few simple ingredients. Here’s a detailed description of each one, along with their roles in bringing this delightful dessert to life:
Heavy Whipping Cream
At the heart of this recipe is heavy whipping cream, which is essential for creating the creamy texture that we all love in ice cream. The high fat content in heavy cream (typically around 36-40%) ensures that when whipped, it forms stable peaks that add volume and lightness to the mixture. This ingredient is what gives the ice cream its luxurious mouthfeel and rich flavor, making it the perfect base for any homemade ice cream.
Sweetened Condensed Milk
Sweetened condensed milk is a game-changer in this no-churn recipe. It provides not only sweetness but also a velvety smoothness that complements the whipped cream beautifully. This concentrated milk product is made by removing most of the water from regular milk and adding sugar, resulting in a thick, syrupy consistency. The sweetness of the condensed milk balances the richness of the cream, making each spoonful incredibly indulgent.
Pure Vanilla Extract
Vanilla extract is the secret weapon in this recipe, delivering a warm, aromatic flavor that enhances the overall taste of the ice cream. Using pure vanilla extract is important for achieving that authentic vanilla flavor, as it is derived from real vanilla beans. A splash of this extract elevates the ice cream, creating a comforting and familiar taste that pairs perfectly with any mix-ins you might choose to add.
Pinch of Salt
While it might seem surprising to include a pinch of salt in a dessert recipe, it plays a crucial role in enhancing the flavors of the ice cream. Salt helps to balance the sweetness of the sweetened condensed milk and brings out the natural flavors of the other ingredients. Just a small addition of salt can elevate the entire dessert, making each bite more complex and satisfying.
Optional Mix-Ins
One of the best features of the “Creamy Dreamy No-Churn Vanilla Ice Cream” is its versatility. You can easily customize the flavor with various mix-ins. Here are some ideas to get you started:
– Chocolate Chips: Add semi-sweet or dark chocolate chips for a delightful crunch.
– Crushed Cookies: Incorporate crumbled cookies like Oreos or chocolate wafers for added texture and flavor.
– Fresh Fruit: Fold in pieces of strawberries, blueberries, or bananas for a refreshing twist.
– Nuts: Chopped nuts such as almonds, pecans, or walnuts can add a satisfying crunch and nutty flavor.
The possibilities are endless, allowing you to create a unique ice cream flavor that caters to your personal preferences.
Step-by-Step Instructions
Now that we’ve covered the essential ingredients, let’s move on to the step-by-step instructions for creating your very own “Creamy Dreamy No-Churn Vanilla Ice Cream.” Follow these simple steps, and you’ll have a delightful dessert ready in no time.
Step 1: Gather Your Ingredients
Before you start, ensure you have all the ingredients measured and ready to go. This will make the process smoother and more enjoyable.
– 2 cups of heavy whipping cream
– 1 can (14 ounces) of sweetened condensed milk
– 1 teaspoon of pure vanilla extract
– A pinch of salt
– Optional mix-ins of your choice
Step 2: Whip the Cream
In a large mixing bowl, use an electric mixer to whip the heavy cream on medium-high speed. Whip until stiff peaks form. This process usually takes about 3-5 minutes. Be careful not to over-whip the cream, as it can turn grainy and start to separate. The goal is to achieve a light, fluffy texture that will give your ice cream a delightful mouthfeel.
Step 3: Combine the Other Ingredients
In a separate bowl, combine the sweetened condensed milk, vanilla extract, and a pinch of salt. Mix well until everything is thoroughly combined. The sweetened condensed milk should be smooth and creamy, providing a luscious base for your ice cream.
Step 4: Fold the Mixture Together
Once your whipped cream is ready, gently fold it into the sweetened condensed milk mixture. Use a spatula to incorporate the whipped cream in batches, taking care not to deflate the whipped cream too much. The folding technique allows you to maintain the airiness of the whipped cream, which is essential for a light and creamy ice cream.
Step 5: Add Optional Mix-Ins
If you’re choosing to add mix-ins, now is the time! Gently fold in your desired ingredients, ensuring they are evenly distributed throughout the mixture. Be creative and have fun with your choices—this is where you can personalize your ice cream to suit your taste buds.
Step 6: Freeze the Mixture
Transfer the ice cream mixture into a freezer-safe container. Spread it evenly and smooth the top with a spatula. Cover the container tightly with a lid or plastic wrap to prevent ice crystals from forming. Place it in the freezer for at least 6 hours or overnight for the best results.
After the ice cream has fully frozen, it will be ready to scoop and enjoy.
This simple no-churn vanilla ice cream recipe not only saves you time but allows you to indulge in a creamy, delicious treat that can be enjoyed any time of the year. Stay tuned for the next section, where we will delve deeper into serving suggestions, tips for perfect results, and answer some common questions about this delightful dessert.

Whipping the Cream: Techniques for Achieving the Perfect Peaks
To create the luscious texture that makes Creamy Dreamy No-Churn Vanilla Ice Cream so delectable, mastering the art of whipping cream is essential. Begin with chilled heavy cream; the colder the cream, the better it will whip. Use a large mixing bowl to provide ample space for the cream to expand. An electric mixer is typically the most efficient tool, but a whisk can be used if you’re up for a workout.
Start whipping the cream on medium speed, gradually increasing to high as it begins to thicken. The goal is to achieve stiff peaks, which means the cream will hold its shape when you lift the whisk or beaters. This process usually takes about 3 to 5 minutes. Be vigilant, as the fine line between perfectly whipped cream and overwhipped cream can be easily crossed. Overwhipping can lead to a grainy texture and even the beginnings of butter formation, which is not what you want for your ice cream.
Importance of Not Overwhipping
The texture of your ice cream hinges on the whipping process. Overwhipped cream can compromise the creaminess and smoothness of your final product. When the cream is overwhipped, it loses its airy quality and can become clumpy. If you find yourself in this situation, you can sometimes salvage it by gently folding in a small amount of unwhipped cream until you reach the desired consistency. Always keep an eye on the cream as you whip, and stop as soon as you see those stiff peaks forming.
Combining Mixtures: How to Properly Mix the Sweetened Condensed Milk and Vanilla
Once you have your cream whipped to perfection, it’s time to combine it with the sweetened condensed milk. In a separate bowl, mix the sweetened condensed milk with pure vanilla extract, which enhances the flavor profile of your ice cream. The mixture should be smooth and well-combined before introducing it to the whipped cream.
When combining these two mixtures, it’s important to do so gently. Using a spatula, scoop a portion of the whipped cream into the sweetened condensed milk mixture. This step lightens the dense mixture, making it easier to fold in the remaining whipped cream without deflating it. After incorporating the initial portion, continue to fold in the rest of the whipped cream gradually, ensuring that you maintain the fluffy texture, which is crucial for achieving that dreamy ice cream consistency.
Folding Techniques: Tips on Folding to Maintain Airiness
Folding is a technique that requires a gentle touch. Using a rubber spatula, start from the bottom of the bowl and scoop upwards, rotating the bowl as you go. This method helps to incorporate ingredients without losing the air you’ve whipped into the cream. Turn the bowl gently while you fold, allowing the lighter mixture to lift the heavier condensed milk base.
Be patient during this process. It’s better to take a few extra folds to fully incorporate the mixtures than to rush and end up with a deflated volume. Aim for a uniform color and texture, with no streaks of white remaining from the whipped cream. This careful folding will ensure that your ice cream remains light and airy.
Incorporating Mix-ins: Best Practices for Even Distribution
If you wish to add mix-ins like chocolate chips, crushed cookies, or fruit, do so after the base is fully combined. Sprinkle your chosen mix-ins over the surface of the mixture and gently fold them in using the same technique as before. This helps distribute them evenly without compromising the texture of the cream.
For best results, consider the size and weight of your mix-ins. Smaller pieces will blend in more seamlessly, while larger items may require a bit more finesse to ensure they are evenly distributed without overpowering the ice cream’s base. If you’re using particularly heavy items, like nuts, you might want to coat them in a bit of the ice cream base first to help them float and distribute evenly.
Transferring and Freezing: Tips on Selecting the Right Container and Ensuring Even Freezing
Once your mix-ins are incorporated, it’s time to transfer the mixture into a suitable container for freezing. An airtight container is essential to prevent ice crystals from forming and to keep your ice cream fresh. Choose a shallow container rather than a deep one to allow for even freezing. This will also make scooping easier when you’re ready to serve.
Before placing the container in the freezer, smooth the top of the ice cream mixture with a spatula to create an even surface. Cover the container with a lid or plastic wrap, pressing it directly against the surface of the ice cream to minimize air exposure. Freeze the ice cream for at least 6 hours or overnight for the best results. The longer it freezes, the firmer and creamier your ice cream will be.
Serving Suggestions
When it comes to serving your Creamy Dreamy No-Churn Vanilla Ice Cream, the possibilities are endless. Here are some creative ideas:
Different Vessel Options (Bowls, Cones)
Serving your homemade ice cream can be as simple or as elaborate as you like. Classic options include traditional ice cream cones or decorative bowls. For a fun twist, consider serving the ice cream in waffle cones or even in edible bowls made from cookie dough. These options not only add visual appeal but also enhance the flavor experience.
Topping Suggestions (Sauces, Sprinkles)
Topping your ice cream can elevate its flavor profile dramatically. Drizzle with warm chocolate sauce, caramel, or fruit compote for a delightful contrast to the creamy base. Sprinkles add a fun crunch and a pop of color, while crushed cookies or nuts can provide additional texture. Don’t hesitate to mix and match toppings to create your signature dessert.
Pairing with Other Desserts (Cakes, Pies)
For those who enjoy a more decadent dessert, consider pairing your no-churn vanilla ice cream with other treats. A slice of warm pie or cake topped with a scoop of ice cream creates a comforting and indulgent dessert. A rich chocolate cake or a classic apple pie are perfect companions. The combination of hot and cold, along with differing textures, will make for an unforgettable dessert experience.
Nutritional Information
When indulging in homemade ice cream, it’s important to be mindful of nutritional content. A standard serving of homemade no-churn vanilla ice cream (about ½ cup) generally contains around 200 calories, with fat content primarily from the heavy cream used. It’s rich, creamy, and delicious, making it a treat to savor.
For those watching their sugar intake, consider reducing the amount of sweetened condensed milk or substituting with a sugar-free alternative. Additionally, portion control is key; serving smaller scoops can help manage caloric intake while still allowing you to enjoy the flavors.
Conclusion
Making Creamy Dreamy No-Churn Vanilla Ice Cream at home is not only easy but also a rewarding experience that allows for creativity and personalization. The simple ingredients come together to create a treat that is perfect for any occasion or just a casual afternoon at home.
Don’t hesitate to experiment with different flavors, mix-ins, and toppings to discover your own signature style. Homemade treats are often the highlight of gatherings, bringing family and friends together over shared delight. So grab your mixing bowl and whisk, and start creating your own creamy dream today!

