Indulge in Decadence with Caramel Swirl Cheesecake Cups
Cheesecakes have long been a beloved dessert around the world, with their creamy texture and rich flavors making them a perfect indulgence for any occasion. Among the myriad of cheesecake variations, the Caramel Swirl Cheesecake Cups stand out, offering a delightful twist on the classic dessert. What makes these cups so appealing is their individual serving size—ideal for parties, gatherings, or simply a treat for yourself. The combination of smooth cheesecake and luscious caramel creates a flavor profile that is both luxurious and satisfying.
This recipe invites you to explore the ease of preparation and the perfect balance of creamy and sweet, capturing the essence of what makes cheesecakes so irresistible. As you dive into the steps ahead, you can expect to create a delightful dessert that not only tastes incredible but also looks stunning, thanks to the beautiful caramel swirl that enhances its visual appeal.
Understanding the Base: The Cheesecake Crust
Before we can indulge in the rich, creamy filling of the cheesecake, we must first lay the foundation with a delicious crust. The crust is a crucial element in any cheesecake, as it provides a contrasting texture and flavor that complements the smoothness of the filling. For the Caramel Swirl Cheesecake Cups, we will typically use graham cracker crumbs as our classic choice for the crust.
Graham Cracker Crumbs
Graham crackers are a staple in cheesecake crusts, providing a slightly sweet and subtly nutty flavor that pairs perfectly with creamy fillings. When crushed into fine crumbs, they create a sturdy base for the cheesecake cups that holds up well against the rich filling and caramel topping.
Granulated Sugar
To enhance the sweetness of the crust, granulated sugar plays an essential role. It not only sweetens the crust but also adds a touch of caramelization when baked, enriching the overall flavor profile.
Melted Butter
The final key ingredient for the crust is melted butter, which acts as a binding agent. When combined with the graham cracker crumbs and sugar, the melted butter helps the crust hold its shape, ensuring that each cheesecake cup has a delightful crunch that contrasts beautifully with the creamy filling.
Crafting the Perfect Cheesecake Filling
Once the crust is prepared, it’s time to focus on the star of the show—the cheesecake filling. The filling is where the magic happens, transforming simple ingredients into a velvety, rich dessert that is sure to please any palate.
Cream Cheese
The foundation of any cheesecake filling is, of course, cream cheese. This ingredient is responsible for the creamy texture that we associate with cheesecakes. When softened and blended, cream cheese provides a smooth base that can be easily combined with other ingredients, allowing for a harmonious mixture that melts in your mouth.
Powdered Sugar
To achieve the desired level of sweetness and a smooth texture, powdered sugar is used in the filling. Unlike granulated sugar, powdered sugar dissolves easily, ensuring that the filling remains silky and free of graininess.
Vanilla Extract
Vanilla extract is another vital ingredient that enhances the overall flavor of the cheesecake. Its warm, aromatic notes complement the sweetness of the cream cheese and sugar, creating a well-rounded taste that elevates the dessert.
Eggs
Eggs serve a crucial role in providing structure and stability to the cheesecake filling. They help to bind the ingredients together while also allowing the filling to set properly as it bakes. This results in a cheesecake that is firm yet creamy, striking the perfect balance between the two.
Sour Cream and Heavy Cream
For an exceptionally rich and velvety finish, both sour cream and heavy cream are incorporated into the filling. Sour cream adds a slight tanginess that cuts through the sweetness, while heavy cream contributes to a luxurious mouthfeel that enhances the overall experience.
Creating the Caramel Swirl
Now that we have our crust and filling ready, it’s time to introduce the element that takes these cheesecake cups to the next level: the caramel swirl. This addition not only enhances the flavor but also adds a stunning visual appeal that will impress anyone who lays eyes on it.
Caramel Sauce
When it comes to caramel, you have options. You can either use store-bought caramel sauce for convenience or make your own from scratch for a more personalized touch. Homemade caramel can elevate the dish, allowing you to control the flavor and consistency, but high-quality store-bought sauces can also yield delicious results with minimal effort.
Incorporating Caramel into the Filling
The process of incorporating caramel into the cheesecake filling is simple yet effective. You’ll want to reserve a portion of the caramel sauce to create the swirl, blending the remaining caramel into the filling to infuse it with flavor. This ensures that each bite is a delightful combination of creamy cheesecake and rich caramel.
Swirling Technique
To achieve a beautiful caramel swirl, it’s important to be gentle. After pouring the filling into the crust, drizzle the reserved caramel sauce on top and use a knife or skewer to create swirls. The key is to avoid overmixing; you want distinct ribbons of caramel throughout the filling, not a uniform blend. This artistic touch not only enhances the flavor but also creates an eye-catching dessert that is sure to impress.
Step-by-Step Instructions for Cheesecake Cups
With all the components in place, you’re ready to embark on the process of creating these decadent Caramel Swirl Cheesecake Cups. Following a step-by-step approach will ensure that you achieve the best possible results.
1. Preheat the Oven: Begin by preheating your oven to 325°F (163°C). This allows for an even baking temperature, which is essential for achieving the perfect cheesecake texture.
2. Prepare the Crust: In a mixing bowl, combine graham cracker crumbs, granulated sugar, and melted butter. Mix until well combined and the crumbs resemble wet sand. Evenly distribute the mixture into cupcake liners placed in a muffin tin, pressing down to form a compact layer.
3. Bake the Crust: Bake the crusts in the preheated oven for about 8-10 minutes or until lightly golden. Remove from the oven and let cool while you prepare the filling.
4. Make the Filling: In a large mixing bowl, beat the softened cream cheese until smooth. Gradually add in the powdered sugar, mixing until fully incorporated. Add the vanilla extract, eggs, sour cream, and heavy cream, and continue to blend until the mixture is smooth and creamy.
5. Add Caramel: Stir in most of the caramel sauce into the cheesecake filling, reserving a small amount for swirling later.
6. Pour the Filling: Carefully pour the cheesecake filling into the cooled crusts, filling each cup nearly to the top.
7. Create the Swirl: Drizzle the reserved caramel sauce on top of the filling in each cup. Using a knife or skewer, gently swirl the caramel into the filling without overmixing.
These initial steps set the stage for a dessert that is not only indulgent but also incredibly satisfying to make. As you follow along with the recipe, you’ll find that the Caramel Swirl Cheesecake Cups are not just desserts; they are an experience to be savored and enjoyed.

Creating the perfect dessert can often be a daunting task, but with the right recipe and techniques, you can easily impress your family and friends. In this section, we will delve into the detailed steps of making Caramel Swirl Cheesecake Cups, including essential baking tips, serving suggestions, nutritional information, and a concluding note that will encourage you to embark on this delightful culinary journey.
Detailed Walkthrough of the Recipe
Preheating the Oven
The first step in baking any cheesecake is preheating your oven. This is crucial for achieving the right texture and consistency in your dessert. An oven that is too cool can lead to uneven baking, while an overly hot oven may cause your cheesecake to crack. Preheat your oven to 325°F (163°C) for optimal results. This moderate temperature allows the cheesecake to bake evenly without the risk of overcooking the edges while leaving the center underdone.
Preparing the Crust
Creating the crust is a foundational step that sets the stage for your cheesecake cups. The crust is typically made from crushed graham crackers combined with melted butter and a bit of sugar.
1. Crushing the Graham Crackers: Use a food processor for a fine crumb or place the crackers in a zip-top bag and crush them with a rolling pin. Aim for a texture similar to sand.
2. Mixing the Ingredients: In a mixing bowl, combine the crushed graham crackers with melted butter and sugar. Mix until the crumbs are evenly coated and have a moist, crumbly texture.
3. Pressing the Crust: Distribute the crust mixture evenly into the bottom of each cupcake liner. Use the back of a measuring cup or your fingers to press the crumbs down firmly. This pressing technique is essential as it helps the crust hold together during baking and ensures a uniform base.
4. Baking Time: Bake the crust in your preheated oven for about 10 minutes, or until it is lightly golden. This short baking time helps to set the crust, providing a sturdy base for the creamy filling.
Making the Filling
The filling is the heart of your cheesecake cups and requires careful mixing to achieve that smooth, creamy texture we all love.
1. Mixing the Cream Cheese: In a large bowl, beat softened cream cheese with an electric mixer until it’s smooth and creamy. This step is vital—ensure that the cream cheese is at room temperature to avoid lumps.
2. Adding Sugar and Vanilla: Gradually add granulated sugar and vanilla extract to the cream cheese. Continue to beat until well combined, ensuring the mixture is light and fluffy.
3. Incorporating Eggs: Add eggs one at a time, mixing on low speed after each addition just until blended. Overmixing at this stage can incorporate too much air, which may cause the cheesecake to crack during baking.
4. Final Mixing: Once the eggs are incorporated, mix in sour cream or heavy cream for added richness. This step enhances the dessert’s creaminess and smooth texture.
Adding the Caramel Swirl
Creating the caramel swirl is what elevates these cheesecake cups from ordinary to extraordinary. Here’s how to do it perfectly:
1. Layering the Caramel: After pouring the cheesecake filling into the crust-lined cups, drizzle a tablespoon of caramel sauce over the top of each filling.
2. Swirling Technique: Using a toothpick or the end of a skewer, gently swirl the caramel into the cheesecake filling. Be careful not to over-swirl; you want to create a beautiful marbled effect without fully mixing the caramel into the filling.
Baking and Cooling
Once you have your cheesecake filled and swirled, it’s time to bake.
1. Baking Time: Place the filled cupcake tins in the oven and bake for about 20-25 minutes. Keep an eye on them; they should be set around the edges but still have a slight jiggle in the center.
2. Cooling: After baking, turn off the oven and leave the cheesecake cups inside for an additional 10 minutes with the door slightly ajar. This gradual cooling helps prevent cracks. After this, remove them from the oven and allow them to cool at room temperature before transferring them to the refrigerator.
Chilling: The Key to Cheesecake Perfection
Chilling is an essential step in the cheesecake-making process that can significantly impact the final product.
The Science Behind Chilling
When you chill your cheesecake cups, the cooling process allows the flavors to meld together, enhancing the overall taste. Moreover, chilling helps the cheesecake set properly, resulting in a creamy, firm texture that is easy to serve.
Optimal Chilling Times
For the best results, refrigerate your cheesecake cups for at least 4 hours, but overnight is even better. This extended chilling time allows the flavors to deepen and the texture to reach that perfect balance of firmness and creaminess, making every bite a delightful experience.
Serving Suggestions and Presentation Ideas
Presentation is key when it comes to desserts, and these Caramel Swirl Cheesecake Cups are no exception. Here are some creative serving suggestions:
Garnishing Ideas
1. Extra Caramel Drizzle: Just before serving, drizzle extra caramel sauce over the top for an indulgent touch.
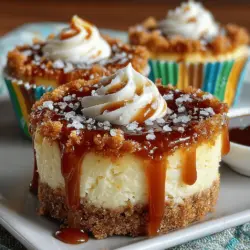
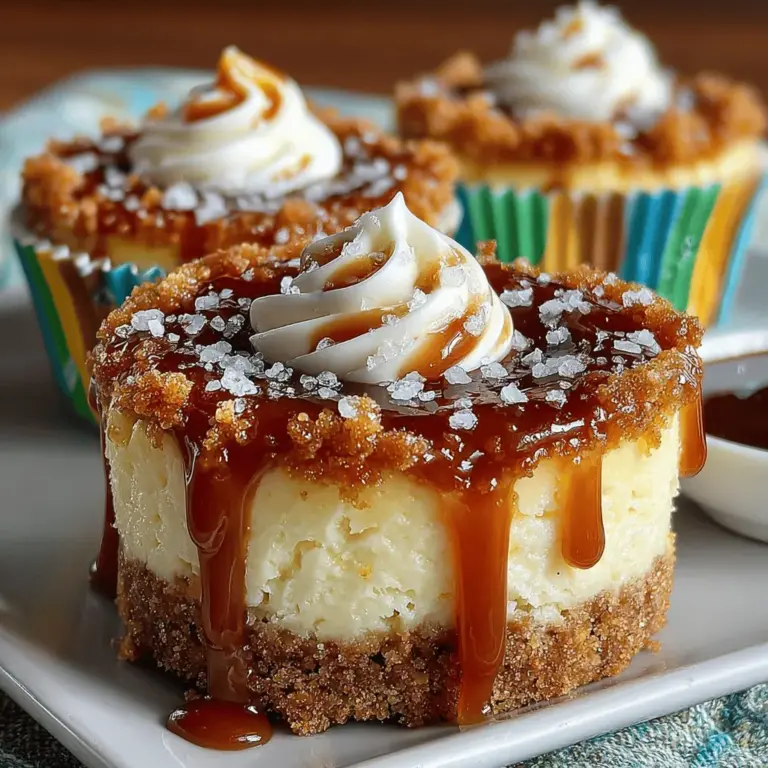
2. Sea Salt Sprinkling: A light sprinkle of flaky sea salt over the caramel adds a beautiful contrast and enhances the flavor profile.
Beverage Pairings
Pair your cheesecake cups with a delicious beverage to elevate the dessert experience. Consider serving alongside:
– Coffee: The rich flavors of coffee complement the sweetness of the cheesecake beautifully.
– Dessert Wines: Sweet dessert wines like Moscato or Port can enhance the flavors and provide a delightful pairing.
Serving Presentation
For an eye-catching presentation, serve your cheesecake cups in colorful cupcake liners or on decorative plates. You can also garnish the plates with fresh berries or mint leaves for an added pop of color and freshness.
Nutritional Information and Serving Size
Understanding the nutritional aspects of your dessert can help you enjoy it in moderation.
Breakdown of Serving Size
This recipe typically yields about 12 cheesecake cups. Here’s a general overview of the nutritional content per serving:
– Calories: Approximately 220-250 calories per cup
– Fat: 15g
– Carbohydrates: 27g
– Protein: 4g
These values are approximate and can vary based on specific ingredient brands and measurements. Keep in mind that indulgence is part of the joy of dessert, so enjoy responsibly!
Conclusion
Creating Caramel Swirl Cheesecake Cups is not just about baking; it’s about sharing a delightful experience with family and friends. The creamy filling, buttery crust, and luscious caramel swirl come together to create a dessert that impresses on both taste and presentation. Whether you’re celebrating a special occasion or simply indulging in a sweet treat, these cheesecake cups are the perfect choice.
So, embrace the joy of baking and try your hand at making these delectable Caramel Swirl Cheesecake Cups. With each bite, you’ll experience the satisfaction of creating something deliciously special that everyone will love. Happy baking!