Indulge in Decadence with Oreo Mocha Bliss Cheesecake Bars
In the realm of desserts, few combinations evoke the same level of bliss as chocolate, coffee, and creamy cheesecake. Enter the Oreo Mocha Bliss Cheesecake Bars—an irresistible treat that seamlessly blends the rich flavors of mocha with the crunchy delight of Oreo cookies. Whether you’re planning a gathering, celebrating a special occasion, or simply treating yourself to something decadent, these no-bake cheesecake bars are as easy to make as they are delicious.
The allure of cheesecake is universal; its creamy texture and rich flavor have made it a beloved dessert for generations. By incorporating the classic taste of Oreo cookies and the robust notes of mocha, these cheesecake bars elevate the traditional dessert into something truly extraordinary. In this article, we will take you through a detailed exploration of this delightful recipe, from the ingredients to the step-by-step instructions, ensuring that you can recreate this dessert with confidence.
Understanding the Ingredients: A Closer Look at What Makes This Dessert Special
The success of any recipe lies in its ingredients. For the Oreo Mocha Bliss Cheesecake Bars, each component plays a crucial role in building the overall flavor and texture of the dessert. By understanding the purpose of each ingredient, you can appreciate how they come together to create this indulgent treat.
The Crust: The Foundation of Flavor
– Oreo Cookies: The star of the crust, offering a rich chocolate flavor that pairs perfectly with the creamy filling. The distinct taste of Oreos adds a delightful crunch and sweetness that serves as the perfect base for the cheesecake.
– Unsalted Butter: This ingredient provides moisture and binds the Oreo crumbs together, creating a sturdy base. The richness of butter enhances the overall flavor of the crust, making it even more delectable.
The Cheesecake Filling: A Symphony of Flavors
– Cream Cheese: The main ingredient that contributes to the cheesecake’s creamy texture and tangy flavor. It’s essential for creating that classic cheesecake base that everyone loves.
– Powdered Sugar: Adds sweetness and helps achieve a smooth consistency in the filling. Unlike granulated sugar, powdered sugar dissolves easily, ensuring a creamy, lump-free mixture.
– Heavy Cream: When whipped, it provides lightness and a luxurious mouthfeel that elevates the cheesecake filling. The heavy cream adds richness without making the dessert too dense.
– Vanilla Extract: This versatile ingredient enhances the overall flavor profile of the cheesecake, adding warmth and depth that complements the chocolate and coffee notes.
– Instant Coffee Granules: These little granules infuse the filling with a rich mocha flavor, perfect for coffee lovers. The coffee also intensifies the chocolate flavor, creating a harmonious blend of tastes.
– Cocoa Powder: Adds depth and an additional layer of chocolatey goodness to the filling. This ingredient ensures that the mocha flavor is prominent, creating a well-rounded dessert.
– Mini Chocolate Chips: While optional, these tiny morsels of chocolate can be folded into the filling for extra bursts of chocolate flavor, making each bite even more delightful.
The Topping: Finishing Touches for Visual and Flavor Appeal
– Whipped Cream: A classic topping for cheesecakes, whipped cream lightens the dessert and adds a creamy touch on top. It provides a beautiful contrast to the dense cheesecake bars.
– Crushed Oreo Cookies: A decorative and flavorful garnish that ties back to the crust, adding texture and visual appeal to the finished dessert.
– Dark Chocolate Shavings: These elegant shavings elevate the presentation and add a touch of sophistication to the bars, enhancing the overall indulgence.
Step-by-Step Instructions: Crafting Your Cheesecake Bars
Creating the Oreo Mocha Bliss Cheesecake Bars is a straightforward yet rewarding process. Follow these detailed steps to ensure your dessert turns out perfectly.
Preparing the Crust: Building a Solid Base
1. Crush the Oreo Cookies: Begin by placing the Oreo cookies in a food processor. Pulse until you achieve fine crumbs. If you don’t have a food processor, you can also place the cookies in a zip-top bag and crush them with a rolling pin.
2. Combine with Butter: In a mixing bowl, combine the crushed Oreo cookies with melted unsalted butter. Stir until the crumbs are evenly coated and the mixture resembles wet sand.
3. Press into the Pan: Line an 8×8-inch square baking pan with parchment paper, allowing some overhang for easy removal later. Transfer the Oreo mixture to the prepared pan and press it firmly into an even layer, creating a solid crust. Use the back of a measuring cup or your fingers to ensure it’s tightly packed.
4. Chill the Crust: Place the pan in the refrigerator for about 10-15 minutes to allow the crust to firm up while you prepare the cheesecake filling. This step is crucial for ensuring that the crust holds its shape when you slice the bars later.
With the crust set and ready, you’ll be well on your way to creating the creamy, chocolatey filling that will make these cheesecake bars truly special. Stay tuned as we delve into the next steps, where we will explore the cheesecake filling and how to bring all these delightful flavors together.
Chill to Create a Sturdy Foundation
Before diving into crafting the cheesecake filling, it’s crucial to ensure that the crust has had enough time to chill. This process allows the butter in the crust to firm up, creating a solid base that will hold the cheesecake filling beautifully. Place the crust in the refrigerator for at least one hour, or until it is firm to the touch. This chilling step is vital for achieving the right texture and preventing the filling from sliding off when you cut the bars.
Making the Cheesecake Filling: Achieving Creamy Perfection
Now that your crust is perfectly chilled, it’s time to prepare the luxurious cheesecake filling. The filling is where the magic truly happens, blending the rich flavors of coffee and chocolate with the creaminess of cheesecake.
Dissolve Instant Coffee in Hot Water and Let It Cool
Begin by dissolving 2 tablespoons of instant coffee in 2 tablespoons of hot water. Stir until the coffee granules are completely dissolved. This step is essential for infusing the mocha flavor into the cheesecake without any graininess. Once dissolved, set it aside to cool while you prepare the other ingredients.
Beat the Cream Cheese and Powdered Sugar Until Smooth
In a large mixing bowl, add 16 ounces of softened cream cheese and 1 cup of powdered sugar. Using a hand mixer or a stand mixer fitted with a paddle attachment, beat the cream cheese and powdered sugar together at medium speed until the mixture is smooth and creamy. This process should take about 2 to 3 minutes. Ensure there are no lumps, as this will affect the final texture of your cheesecake bars.
Incorporate the Coffee Mixture, Vanilla, and Cocoa Powder
Once the cream cheese is smooth, it’s time to add in the dissolved coffee mixture, 1 teaspoon of vanilla extract, and ¼ cup of unsweetened cocoa powder. Mix on low speed until all ingredients are well incorporated. The coffee and cocoa will provide a rich mocha flavor that perfectly complements the creaminess of the cheesecake. Be sure to scrape down the sides of the bowl with a spatula to ensure everything is evenly mixed.
Whip the Heavy Cream and Gently Fold It into the Cream Cheese Mixture, Along with Mini Chocolate Chips
Next, in a separate bowl, whip 1 cup of heavy cream until stiff peaks form. This step is crucial for adding airiness to the cheesecake filling. Using a rubber spatula, gently fold the whipped cream into the cream cheese mixture in three additions. Be careful not to deflate the whipped cream; this will ensure your cheesecake bars are light and fluffy.
Once combined, stir in ½ cup of mini chocolate chips for an extra burst of chocolatey goodness. This addition will provide delightful little surprises in each bite.
Assembling the Cheesecake Bars: Layering the Goodness
With both the crust and filling prepared, it’s time to assemble your cheesecake bars.
Pour the Cheesecake Filling Over the Chilled Crust and Smooth the Top
Carefully pour the cheesecake filling onto the chilled Oreo crust. Using a spatula, spread the filling evenly across the crust, smoothing the top to create a beautiful finish. Make sure there are no air pockets; this will help ensure a creamy texture throughout the bars.
Cover and Refrigerate Until Set, Ideally Overnight
Once the filling is evenly spread, cover the pan with plastic wrap or aluminum foil. Place it back in the refrigerator and allow it to chill for at least 4 hours, though overnight is ideal. This cooling time allows the filling to firm up, making it easier to cut into bars later.
Serving the Bars: Presenting Your Creation
After the cheesecake bars have set, the moment of truth arrives: serving them!
Lift the Cheesecake from the Pan Using the Parchment Paper
To remove the cheesecake from the pan, simply lift it out using the edges of the parchment paper. This step makes it easy to transfer the cheesecake without damaging the edges.
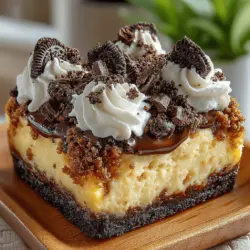
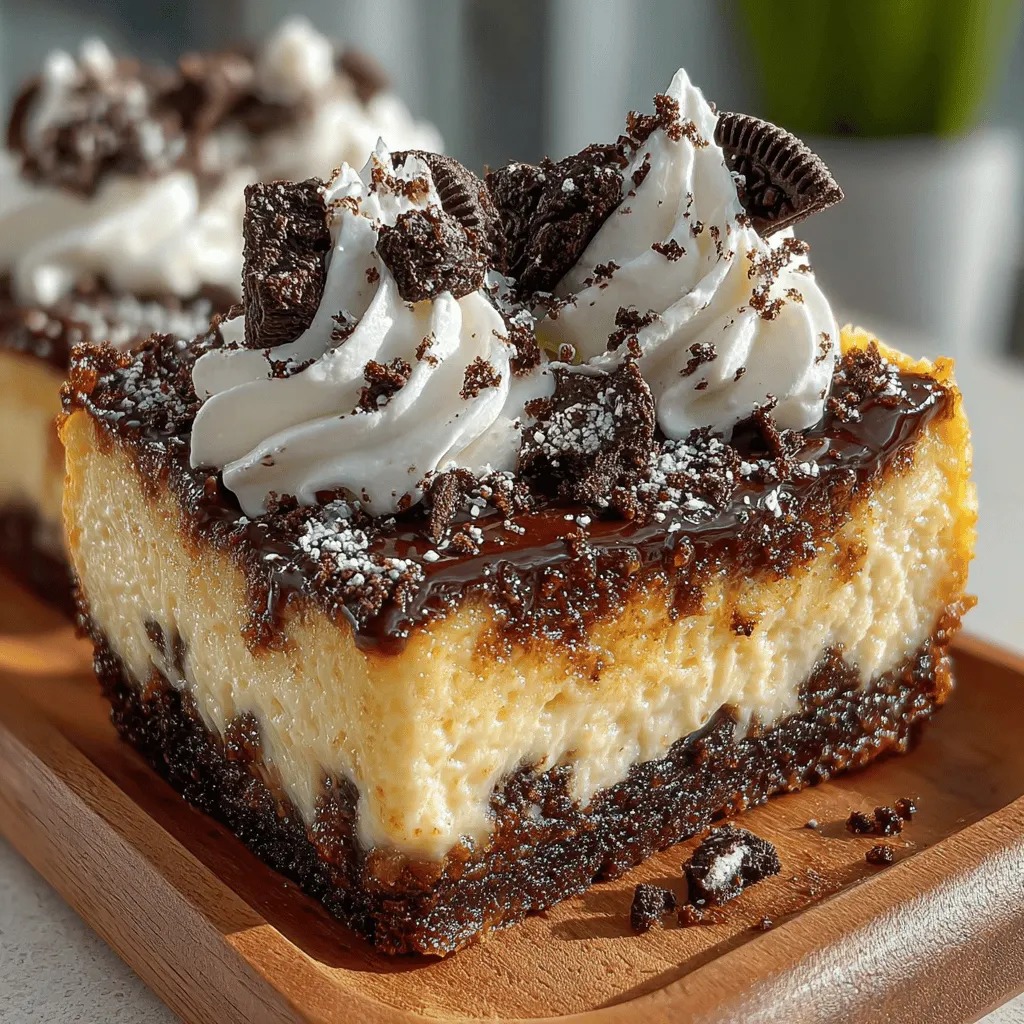
Cut into Bars and Top with Whipped Cream, Crushed Oreos, and Chocolate Shavings
Using a sharp knife, cut the cheesecake into bars of your desired size. For a professional touch, clean the knife between cuts to ensure neat edges. Once cut, you can garnish each bar with a dollop of whipped cream, a sprinkle of crushed Oreos, and a few chocolate shavings to enhance the presentation. These toppings not only add visual appeal but also introduce additional textures and flavors.
Flavor Profile: What to Expect from Each Bite
The Oreo Mocha Bliss Cheesecake Bars are a delightful symphony of flavors and textures. Each bite offers a satisfying crunch from the Oreo crust, perfectly balanced by the creamy and velvety cheesecake filling. The rich mocha flavor, thanks to the coffee and cocoa, adds a sophisticated twist that elevates the dessert beyond ordinary cheesecake. The lightness of the whipped cream topping contrasts beautifully with the richness of the filling, creating a harmonious blend that will leave your taste buds singing.
Nutritional Information: Understanding the Indulgence
While these cheesecake bars are undeniably a treat worth indulging in, it’s essential to be aware of their nutritional profile. Each bar contains a rich combination of cream cheese, sugar, and chocolate, making them a dessert best enjoyed in moderation. On average, one bar contains approximately 300 calories, 20 grams of fat, and 25 grams of sugar. These numbers can vary depending on portion sizes and specific ingredients used. As with any indulgent dessert, savor each bite and enjoy responsibly.
Perfect Occasions for Oreo Mocha Bliss Cheesecake Bars
These cheesecake bars are incredibly versatile and are perfect for a variety of occasions. Here are some ideas for when to serve them:
– Birthday Parties: Delight your guests with a rich and decadent dessert that is sure to impress.
– Holiday Gatherings: The mocha flavor makes these bars a wonderful addition to any holiday dessert table, especially during winter celebrations.
– Potluck Dinners: They are easy to transport and can be made ahead of time, making them a great choice for potlucks.
– Coffee-Themed Events: Pair these bars with your favorite brew for a delightful coffee-themed dessert experience.
– Casual Family Dinners: Treat your family to a special dessert after a cozy meal at home.
Conclusion: Savor the Bliss
The Oreo Mocha Bliss Cheesecake Bars are more than just a dessert; they represent a delightful culinary experience that combines the comforting flavors of chocolate and coffee with the creamy richness of cheesecake. With their no-bake simplicity and impressive presentation, they are sure to be a hit at any gathering. By following the steps outlined in this recipe, you can create a delicious treat that will not only impress your friends and family but also provide a moment of bliss with every bite. Enjoy the process of making and sharing these delightful cheesecake bars, and savor each blissful moment they bring!