Introduction
When it comes to comfort food, few dishes can rival the classic tuna melt. This delectable sandwich, with its warm, gooey cheese and savory tuna filling, has nestled itself into the hearts and stomachs of many. It’s not just a meal; it’s a nostalgic embrace that brings back memories of cozy dinners and casual lunches. The Tuna Melt Bliss recipe elevates this beloved dish by infusing it with rich flavors and a creamy texture that will keep you coming back for more. Whether you’re looking for a quick lunch or a satisfying dinner, this recipe is perfect for any occasion, offering a delightful balance of taste and convenience.
The beauty of the Tuna Melt Bliss lies not only in its flavor but also in its straightforward preparation. With minimal ingredients and a quick cooking time, you can whip up this satisfying meal in under 30 minutes. Perfect for busy weeknights or leisurely weekends, this recipe ensures that you can enjoy a comforting, homemade dish without the fuss.
The Allure of Tuna Melts
The tuna melt has a storied history in American cuisine, tracing its origins back to the early 1900s. It emerged during a time when canned goods became staples in American households, offering convenience and affordability. Over the decades, it evolved into a diner favorite, often served alongside crispy fries or a simple salad. Its popularity surged in the mid-20th century, becoming a go-to comfort food for many.
Beyond its rich history, the tuna melt boasts several nutritional benefits. Tuna is an excellent source of lean protein, omega-3 fatty acids, and essential vitamins and minerals, making it a smart choice for health-conscious eaters. Combined with the other ingredients in this recipe, the tuna melt becomes not only a delicious option but also a nourishing one.
The versatility of the tuna melt allows for countless culinary adaptations. Whether you prefer a classic version or want to experiment with gourmet ingredients, the possibilities are endless. You can add different cheeses, incorporate vegetables, or even spice things up with various condiments. The tuna melt can easily be customized to suit your taste preferences, ensuring that it remains a favorite in many households.
Ingredients Breakdown
To craft the perfect Tuna Melt Bliss, it’s essential to choose the right ingredients. Each component plays a crucial role in achieving the ideal balance of flavor and texture.
– Tuna: The star of the dish, high-quality canned tuna is paramount. Opt for tuna packed in water for a lighter taste, or choose oil-packed tuna for a richer flavor. Look for brands that prioritize sustainability. The quality of the tuna will directly influence the overall taste of your melt.
– Mayonnaise: This creamy condiment is key to achieving the tuna salad’s smooth texture. It adds richness and moisture, ensuring that the filling doesn’t dry out when heated. For a healthier twist, consider using Greek yogurt as a substitute, which will also provide a tangy flavor.
– Dijon Mustard: A small yet impactful addition, Dijon mustard contributes a zesty kick that cuts through the richness of the mayonnaise. It balances the flavors and adds depth to the tuna mixture. If you prefer a milder taste, you can adjust the amount to your liking.
– Celery and Red Onion: These crunchy vegetables enhance the texture of the tuna melt, providing a delightful contrast to the creamy filling. Celery adds a refreshing crunch, while red onion brings a subtle sweetness and bite. Feel free to adjust the quantities or omit them entirely based on your preference.
– Cheddar Cheese: The choice of cheese is crucial for achieving that classic melt. Sharp cheddar offers a robust flavor that pairs beautifully with tuna, creating a harmonious blend of tastes. For a gourmet twist, consider using Gruyère or Monterey Jack for a different flavor profile.
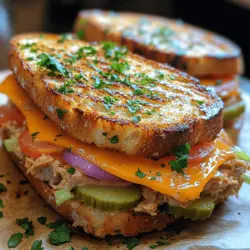
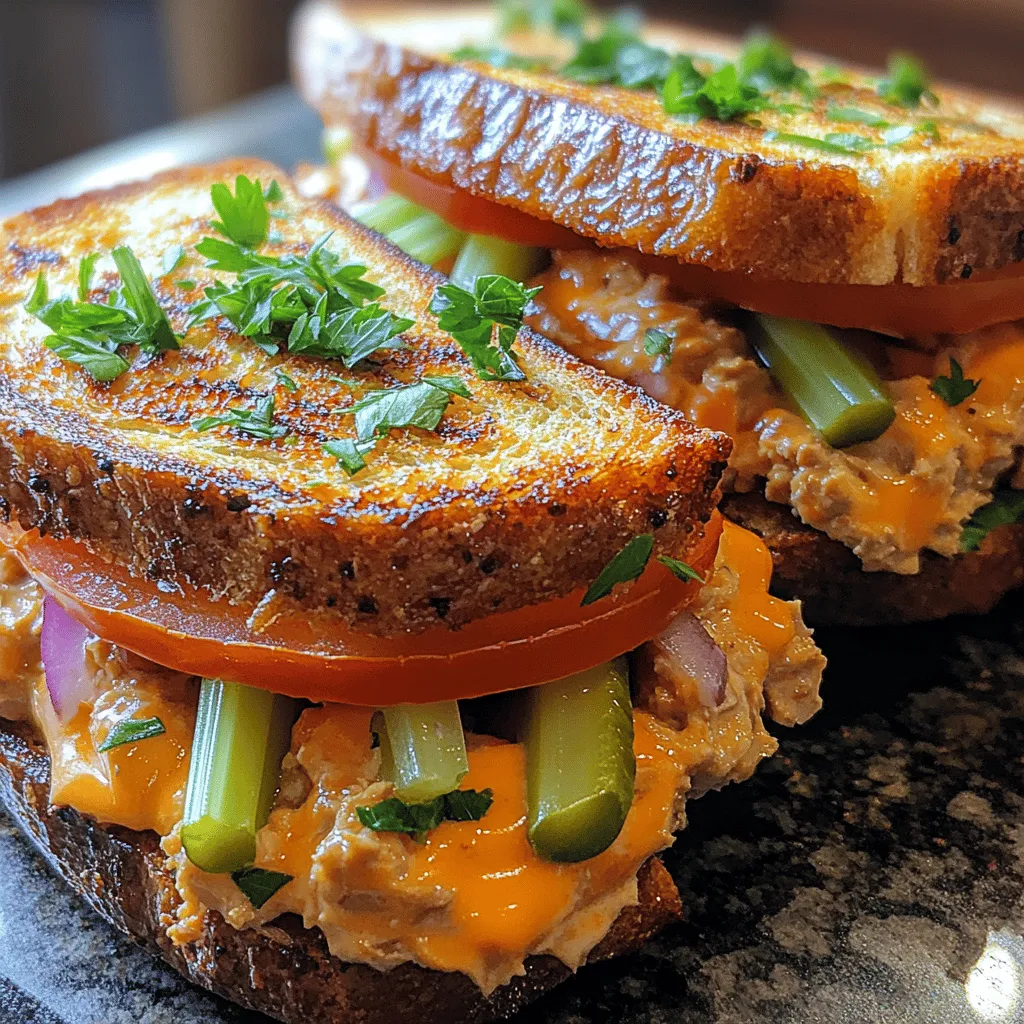
– Sourdough Bread: Using sourdough bread is a game-changer for this recipe. Its tangy flavor complements the rich filling, while its sturdy crust provides the perfect crunch. The bread’s texture holds up well against the creamy filling, ensuring a satisfying bite every time.
– Optional Ingredients: To elevate your Tuna Melt Bliss even further, consider adding diced tomatoes, pickles, or fresh parsley. Tomatoes introduce juiciness, pickles add tang, and parsley provides a pop of color and freshness. These optional ingredients can take your melt to the next level, allowing you to personalize it to your taste.
Step-by-Step Preparation
Now that you have a clear understanding of the ingredients, it’s time to dive into the preparation process. This step-by-step guide will walk you through creating the Tuna Melt Bliss, ensuring that you achieve the perfect sandwich every time.
Step 1: Prepare the Tuna Mixture
Begin by draining the canned tuna thoroughly. This step is crucial as excess liquid can make your mixture watery, affecting the overall texture of the melt. Once drained, transfer the tuna to a medium-sized mixing bowl.
Next, add the mayonnaise and Dijon mustard to the bowl. Use a fork to gently break up the tuna while mixing in the mayonnaise and mustard. Aim for a consistency that is creamy but still has some texture. If you’re adding celery and red onion, fold them in at this stage. Ensure the ingredients are evenly distributed, creating a cohesive filling.
Step 2: Cheese It Up
Grate or slice your cheddar cheese, ensuring you have enough to layer generously on top of the tuna mixture. The cheese not only adds flavor but also helps bind the filling together. If you’re feeling adventurous, consider mixing in different types of cheese for a unique flavor profile.
Step 3: Assemble the Sandwich
Take two slices of sourdough bread and lay them flat on a clean surface. Spoon a generous amount of the tuna mixture onto one slice, spreading it evenly. Be generous—this is the heart of your melt! Top the tuna filling with the grated cheese, ensuring that you cover it adequately.
Finally, place the second slice of sourdough on top of the cheese, creating a sandwich. This is the moment when all the delicious components come together, setting the stage for a mouthwatering meal.
Step 4: Grill to Perfection
Heat a skillet or griddle over medium heat and add a little butter or olive oil to coat the pan lightly. Once the pan is hot, carefully place the assembled sandwich onto the skillet.
Cook the sandwich for about 3-4 minutes on one side, or until it’s golden brown and crispy. Use a spatula to gently press down on the sandwich, helping the cheese melt and the bread toast evenly. Once the first side is done, flip the sandwich and repeat the process on the other side. Aim for a deep golden color and a melty interior.
Step 5: Serve and Enjoy
Once both sides are beautifully toasted and the cheese has melted to perfection, remove the sandwich from the skillet. Allow it to cool for a minute before slicing it in half. This brief pause allows the cheese to set slightly, preventing it from oozing out uncontrollably. Serve your Tuna Melt Bliss warm, perhaps with a side of crispy fries or a fresh salad.
By following these steps, you’ll create a delightful Tuna Melt Bliss that showcases the best of this classic comfort food. Enjoy the rich flavors and creamy textures as you indulge in this delicious meal that’s sure to become a staple in your kitchen.
Preparing the Tuna Mixture
The success of your Tuna Melt Bliss begins with a well-prepared tuna mixture. Combining ingredients effectively is crucial for achieving a balanced flavor profile. Start by draining the canned tuna thoroughly to remove excess moisture, which can make your mixture soggy. Once drained, transfer the tuna to a mixing bowl.
Add in mayonnaise, which not only adds creaminess but also enhances flavor. For a classic taste, use regular mayonnaise, but feel free to substitute with Greek yogurt for a lighter version. To this base, mix in finely chopped celery and red onion for a crunch and a burst of freshness. Don’t forget to season generously with salt and pepper; a sprinkle of garlic powder or a squeeze of lemon juice can elevate the mixture even further.
The key is to mix the ingredients until well combined without overworking the tuna. Overmixing can break down the fish too much, resulting in a less appealing texture. Aim for a consistency where the ingredients are evenly distributed but still maintain some chunkiness. This way, each bite of your Tuna Melt will deliver a delightful combination of flavors and textures.
Toasting the Bread
Toasting the bread is a crucial step in creating the perfect Tuna Melt. The right bread not only serves as a foundation for the tuna mixture but also contributes to the overall texture of the dish. Sourdough, whole wheat, or rye are excellent choices, as they can hold up against the moisture of the filling while providing a robust flavor.
To achieve a perfect golden crust, preheat your skillet or griddle over medium heat. Lightly butter one side of each slice of bread. This not only helps in browning but also adds richness to the overall taste. Place the bread butter-side down in the skillet and let it toast until it reaches a golden brown color before flipping it over.
For an added touch, consider sprinkling a bit of garlic powder or herbs on the butter before toasting. This will infuse the bread with additional flavor that complements the tuna mixture. Remember, the goal is to create a sturdy base that can support the filling without becoming too soggy.
Assembling the Melts
Assembling your Tuna Melt is where creativity meets technique. Begin with your toasted bread, placing one slice on a clean surface, buttered side down. Generously spoon your prepared tuna mixture onto the slice, ensuring an even distribution that covers the entire surface.
Next, select a cheese that melts beautifully. Cheddar is a classic choice, but you can also opt for Gruyère, Monterey Jack, or even a blend of cheeses for a richer flavor. Layer the cheese on top of the tuna mixture, allowing it to cover the filling completely. This will help trap the flavors inside and ensure that every bite is cheesy and delicious.
Top with another slice of toasted bread, buttered side up. This layering technique is essential, as it enhances the taste and texture of the dish. The buttered outer layer will crisp up beautifully during grilling, while the cheese melts and mingles with the tuna mixture, creating a harmonious blend of flavors.
Grilling to Perfection
Now that your melts are assembled, it’s time to grill them to perfection. Heat your skillet or griddle over medium-low heat. The key here is to cook slowly, allowing the cheese to melt completely while preventing the bread from burning. Place the assembled Tuna Melts in the skillet, ensuring they have enough space to cook evenly.
Cook for about 3-4 minutes on one side, or until the bread is golden brown and crispy. Carefully flip the melts using a spatula, watching closely to prevent burning. You may want to lower the heat slightly after flipping to ensure the cheese has time to melt without the bread becoming too dark.
For those who want to ensure maximum melty goodness, you can cover the skillet with a lid for a minute or two during cooking. This traps heat and moisture, helping the cheese melt uniformly. Once both sides are beautifully browned and the cheese is gooey, remove the melts from the skillet and let them cool for a minute before slicing.
Serving Suggestions
When it comes to serving Tuna Melt Bliss, the possibilities are endless. This dish pairs wonderfully with a variety of sides that can enhance the meal experience. A crisp green salad drizzled with a tangy vinaigrette makes for a refreshing accompaniment, balancing the richness of the melt. Alternatively, you can serve it with a side of homemade coleslaw for a crunchy contrast.
For those looking for something heartier, classic potato chips or sweet potato fries can add a satisfying crunch. If you want to elevate your plate, consider garnishing your Tuna Melts with a sprinkle of freshly chopped parsley or chives for a pop of color and flavor.
Nutritional Information
Understanding the nutritional content of your Tuna Melt Bliss can help you enjoy this dish with confidence. Each serving typically features a balanced breakdown of macronutrients. A standard tuna melt made with whole wheat bread, tuna, mayonnaise, and cheese contains approximately 400-500 calories, with around 20-25 grams of protein and 15-20 grams of healthy fats primarily from tuna and mayonnaise.
Tuna is an excellent source of lean protein, contributing to muscle repair and overall health. Additionally, it is rich in omega-3 fatty acids, which are beneficial for heart health. The inclusion of mayonnaise adds a creamy texture while supplying essential fats that can help keep you satiated.
Comparatively, a tuna melt can be a healthier choice than many other lunch options, such as fried sandwiches or heavy deli meats, making it a great addition to a balanced diet.
Customization Options
One of the wonderful aspects of Tuna Melt Bliss is its versatility. For those with dietary restrictions, several substitutions can be made without compromising flavor. For a gluten-free option, use gluten-free bread or lettuce wraps for a lighter version. If you’re looking to reduce calories, opt for low-fat mayonnaise or Greek yogurt instead.
For vegans, consider using a plant-based mayonnaise and substituting the tuna with chickpeas or a store-bought vegan tuna alternative. This not only caters to dietary needs but also introduces new flavors and textures to your melt.
Flavor variations can further enhance your tuna melt experience. Add spices like cayenne pepper or paprika for a kick, or incorporate diced jalapeños for some heat. For a Mediterranean twist, mix in olives or sun-dried tomatoes. Experimenting with different cheeses, such as feta or pepper jack, can also yield delicious results.
The Perfect Pairings
To elevate your Tuna Melt Bliss experience, consider the perfect beverage pairings. A chilled glass of Chardonnay or a light lager beer can complement the richness of the melt beautifully. For those preferring non-alcoholic options, a refreshing iced tea with lemon or a sparkling water infused with herbs can provide a refreshing contrast.
When it comes to side dishes, think beyond the usual chips. A comforting cup of tomato soup can enhance the experience and create a classic combination. Alternatively, a simple side of pickles can add a tangy crunch that cuts through the richness of the melt.
Conclusion
Tuna Melt Bliss is not just a meal; it’s an experience that celebrates simplicity and deliciousness. With its easy preparation and adaptability, this dish is perfect for casual lunches, weeknight dinners, or even gourmet gatherings. By incorporating various ingredients and pairings, you can personalize your Tuna Melt to suit any occasion or dietary need.
I encourage you to try this recipe and explore your own variations. Whether you stick to the classic or venture into new flavor territories, the joy of home cooking lies in the creativity and love infused into every bite. Embrace the process, and enjoy the rewarding experience of crafting your own Tuna Melt Bliss.