Apple pie is more than just a dessert; it’s a cherished tradition that evokes memories of family gatherings, holidays, and the comforting embrace of home. Its rich history in American culture has made it synonymous with warmth and nostalgia, often referred to as “America’s favorite dessert.” With its flaky crust, tender apples, and aromatic spices, apple pie is a classic that transcends generations. As the leaves begin to change and the air turns crisp, the allure of this timeless treat grows even stronger, particularly when using seasonal ingredients that celebrate the essence of fall.
Introducing the “Harvest Delight Apple Pie,” a recipe that encapsulates the vibrant flavors of autumn, showcasing the best of what the season has to offer. This pie not only brings together the sweetness of apples but also incorporates the warm, inviting spices that are synonymous with the fall harvest. Using fresh, in-season apples makes all the difference, infusing each bite with a burst of flavor that store-bought variations simply cannot match.
Understanding the Ingredients
To create the perfect Harvest Delight Apple Pie, it’s essential to start with quality ingredients, particularly for the pie crust and filling. Let’s delve into each component, beginning with the crust, which serves as the foundation for this delectable dessert.
The Pie Crust Ingredients
A great pie crust is the backbone of any successful apple pie. For our Harvest Delight Apple Pie, the primary ingredients you’ll need for the crust are:
– All-purpose flour: This is the main ingredient, providing structure and stability to the pie.
– Unsalted butter: Butter adds richness and flavor, contributing to the overall taste and texture.
– Ice water: Used to bind the ingredients together, ice water helps keep the dough cool, ensuring a flaky crust.
The combination of flour, butter, and ice water is critical for achieving the perfect pie crust. The flour provides the necessary gluten structure, while the butter creates a tender texture. It’s important to use chilled butter and ice water in the dough. The cold temperature of these ingredients prevents the butter from melting before baking, which helps form those coveted flaky layers.
The Apple Filling Ingredients
Next, let’s explore the apples that will form the filling of our pie. For a truly delightful flavor profile, we recommend using a combination of:
– Granny Smith apples: Their tartness balances the sweetness of the pie, providing a refreshing bite.
– Honeycrisp apples: Known for their crisp texture and sweetness, Honeycrisp apples complement the tartness of the Granny Smith apples beautifully.
Together, these apple varieties create a harmonious blend of flavors and textures that elevate your pie from ordinary to extraordinary.
In addition to the apples, several other key ingredients enhance the filling:
– Cinnamon: This warm spice is a staple in apple pie, adding depth and a comforting aroma.
– Nutmeg: A pinch of nutmeg adds warmth and complexity, rounding out the spice blend.
– Lemon juice: This brightens the flavors of the apples and helps prevent them from browning too quickly.
– Sugar: The sugar sweetens the filling, balancing the tartness of the apples.
– Flour: A small amount of flour is used to thicken the filling, ensuring it holds together nicely during and after baking.
Each ingredient plays a vital role in creating a balanced and flavorful filling that complements the flaky crust perfectly.
Preparing the Pie Crust
Now that we understand the importance of our ingredients, it’s time to dive into the preparation of the pie crust, which is paramount to the success of our Harvest Delight Apple Pie. Follow these step-by-step instructions to make the perfect pie crust:
1. Mix the dry ingredients: In a large mixing bowl, combine the all-purpose flour and a pinch of salt. The salt enhances the flavor of the crust, so don’t skip this step.
2. Cut in the butter: Using a pastry cutter or your fingertips, work the chilled unsalted butter into the flour mixture until it resembles coarse crumbs. The key is to leave some pea-sized pieces of butter intact, as these will create flakiness in the baked crust.
3. Add the ice water: Gradually add the ice water, a tablespoon at a time, mixing gently with a fork after each addition. Stop adding water once the dough begins to come together. Be cautious not to overmix, as this can lead to a tough crust.
4. Form the dough: Turn the dough out onto a lightly floured surface and gently knead it just until it holds together. Divide the dough into two equal portions, shaping each into a disk. Wrap the disks in plastic wrap and refrigerate for at least 1 hour, or overnight if time allows.
5. Roll out the dough: Once chilled, remove one disk of dough from the refrigerator. On a lightly floured surface, roll the dough out into a circle about 1/8 inch thick, ensuring it is large enough to fit your pie dish.
6. Transfer to the pie dish: Carefully place the rolled-out dough into your pie dish, pressing it gently into the corners. Trim any excess dough hanging over the edges, leaving about a half-inch overhang.
7. Chill the crust again: Before adding the filling, chill the crust for an additional 30 minutes. This step is crucial for maintaining the structure of the crust during baking.
With your pie crust prepared, you’re well on your way to creating a mouthwatering Harvest Delight Apple Pie. Stay tuned for the next section, where we will craft the apple filling that will complete this autumnal masterpiece.
Tips for Best Results
Preparing the Apple Filling
Creating the perfect apple filling is crucial to achieving a delicious Harvest Delight Apple Pie. Start by selecting the right apples. A mix of tart and sweet varieties, such as Granny Smith and Honeycrisp, provides a balanced flavor.
When slicing your apples, uniformity is key. Aim for slices that are about 1/4 inch thick. This ensures even cooking throughout the pie, preventing some apples from becoming mushy while others remain crisp.
After slicing, let your apple mixture sit for at least 15 to 30 minutes. This resting period allows the apples to release their natural juices, which will mix with the sugar and spices to create a flavorful syrup. This syrup not only enhances the taste but also helps to bind the filling together, preventing it from being overly watery.
Assembling the Pie
Rolling Out the Dough
Begin by rolling out your pie dough on a lightly floured surface. Aim for a thickness of about 1/8 inch, which will give you a sturdy yet tender crust. Gently transfer the rolled dough to your pie pan, ensuring it fits snugly.
To prepare your pie pan, lightly grease it or use parchment paper to prevent sticking. Once in the pan, trim any excess dough hanging over the edges, leaving about 1 inch for crimping.
Ensuring a Well-Fitted Crust
For a well-fitted crust, press the dough gently into the bottom and sides of the pan, making sure there are no air bubbles trapped underneath. This step is essential for preventing cracks and leaks during baking. If you want a decorative edge, use your fingers to crimp the dough or a fork to create a beautiful pattern.
Layering the Filling
Once your crust is prepared, it’s time to layer in the apple filling. Start by spooning in half of the apple mixture, then dot it with small pieces of butter. This will melt during baking, adding richness and flavor. Follow up with the remaining apple filling, ensuring an even distribution throughout the crust.
Creative Crimping and Slitting
For the top crust, roll out another layer of dough, similar to the bottom crust. You can either cover the entire pie or make it a lattice top for an aesthetically pleasing design. If you choose to cover the pie entirely, remember to cut slits in the top crust to allow steam to escape. This not only helps with even cooking but also adds a classic touch to your pie.
Baking the Pie
Temperature Settings and Baking Times
Preheat your oven to 425°F (220°C). This high temperature is essential for achieving a golden-brown crust and ensuring the apples cook through. Place the pie on the middle rack and bake for 15 minutes at this temperature. Then, reduce the oven temperature to 350°F (175°C) and continue baking for an additional 30 to 35 minutes.
Doneness Indicators
Watch for visual cues to determine when your pie is done. The crust should be a beautiful golden-brown, and you should see bubbling juices peeking through the slits in the top. If you notice the edges browning too quickly, cover them with strips of aluminum foil to prevent burning.
Cooling and Serving Suggestions
Importance of Cooling
Once baked, allow your pie to cool on a wire rack for at least two hours before slicing. This cooling period is important as it lets the juices thicken, making for cleaner slices. Cutting into a warm pie can lead to a soupy mess, so patience is key.
Serving Recommendations
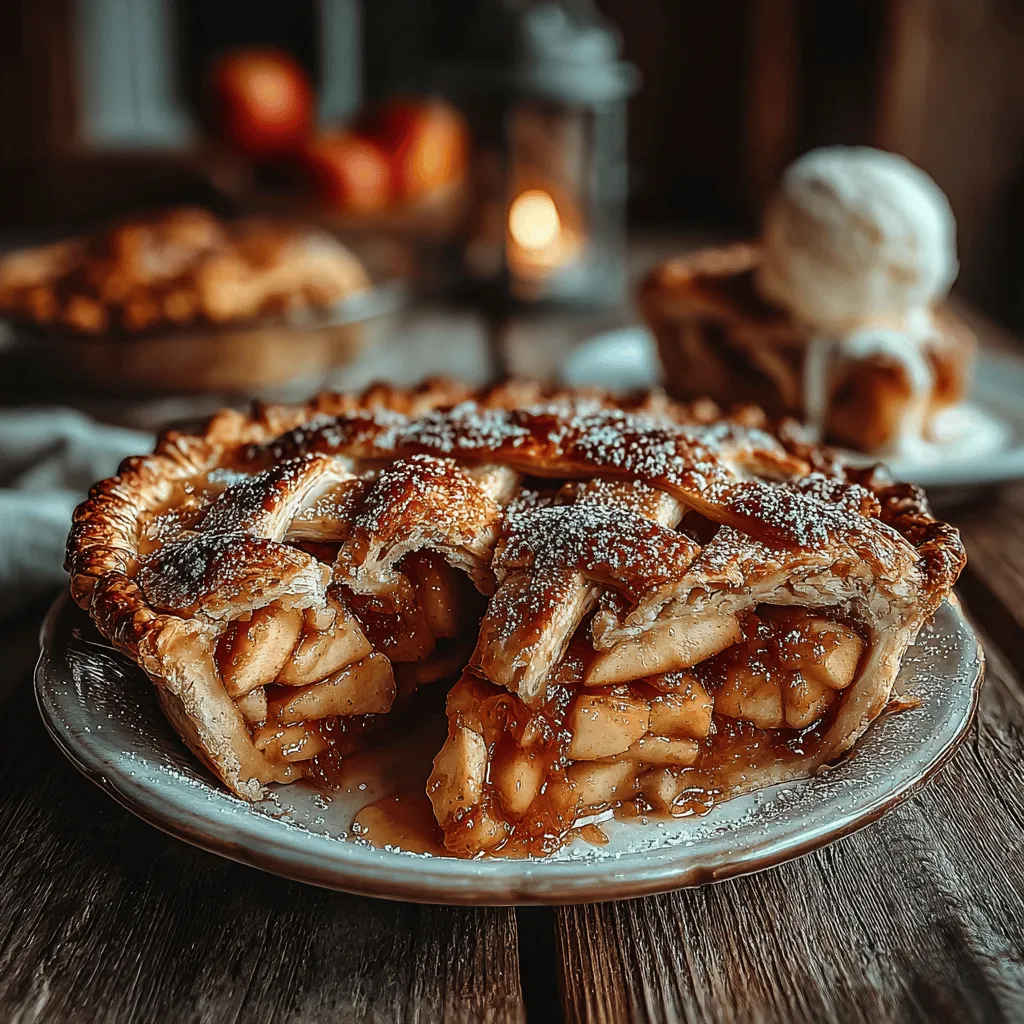
Serve your Harvest Delight Apple Pie warm or at room temperature. Pairing it with a scoop of vanilla ice cream or a dollop of whipped cream elevates the experience, creating a delightful contrast to the warm spiced apples. A sprinkle of cinnamon or a drizzle of caramel sauce can also enhance the flavors.
Conclusion
Making a homemade Harvest Delight Apple Pie is not just about the ingredients; it’s about the joy of creating something special to share with family and friends. This recipe evokes memories of fall gatherings, bustling kitchens, and the warmth of loved ones coming together over a slice of pie.
We encourage you to try your hand at this delicious recipe and experience the comforting flavors of the season. Your homemade apple pie will not only satisfy your taste buds but also create lasting memories around the dinner table. Enjoy your baking adventure!