Introduction
Crème brûlée, often regarded as the epitome of classic French desserts, is a delightful indulgence that has captured the hearts of dessert enthusiasts around the globe. This velvety custard, topped with a layer of caramelized sugar, offers a perfect balance of creamy richness and crunchy texture. Its name, which translates to “burnt cream,” reflects the signature technique of brûlée—the French word for “to burn”—that defines this exquisite dessert.
The allure of homemade crème brûlée lies not only in its delectable taste but also in its beautiful presentation. The golden, crackling sugar crust creates an inviting contrast against the smooth custard beneath. Achieving this dessert at home may seem daunting, but with the right ingredients and techniques, you can create a restaurant-quality treat that will impress your family and friends. High-quality ingredients are essential, particularly when it comes to the main components: genuine vanilla bean and heavy cream. These elements elevate the flavor profile of the dessert, transforming a simple recipe into a divine culinary experience.
Understanding Crème Brûlée
Historical Background of Crème Brûlée
The origins of crème brûlée can be traced back to Europe, with various countries claiming its invention. While the French are the most recognized for this dessert, variations have appeared throughout history in different cultures. The earliest known reference dates back to the 1691 cookbook by François Massialot, a French chef who served at the court of Louis XIV. This recipe was known as “crème brûlée,” and it has since evolved into the version we adore today.
Interestingly, Spain boasts its own similar dessert called “crema catalana,” which is made with lemon or cinnamon for added flavor. In England, you might encounter “Trinity cream,” a dessert that shares similarities with crème brûlée but is traditionally infused with orange zest. Each of these variations highlights the universal appeal of creamy custard desserts across different culinary traditions.
The Science Behind the Custard Texture and Caramelized Sugar Topping
Creating the perfect crème brûlée involves understanding the science behind its components. The custard base is made primarily from heavy cream, egg yolks, and sugar, which come together to create a rich and silky texture. When baked gently in a water bath, the eggs coagulate, thickening the custard while the cream provides moisture and richness. This slow cooking method ensures that the custard sets evenly without curdling.
The caramelized sugar topping is where the magic happens. To achieve that signature crackle, granulated sugar is sprinkled on top of the custard and then heated until it melts and turns golden brown. This process, known as caramelization, transforms the sugar into a delicate layer that contrasts beautifully with the creamy custard below. The result is a dessert that is not only visually stunning but also offers a delightful interplay of textures and flavors.
Ingredients Breakdown
To craft the perfect crème brûlée, it’s crucial to use high-quality ingredients that will enhance the overall flavor and texture of the dessert.
Heavy Cream: The Foundation of the Custard
Heavy cream is the star ingredient in crème brûlée, providing the richness and creaminess that makes this dessert so indulgent. With a fat content typically around 36%, heavy cream contributes to the smooth mouthfeel and luxurious texture of the custard. When selecting heavy cream, look for products that are free from additives and stabilizers, as pure cream will yield the best results.
Vanilla Bean vs. Vanilla Extract: Flavor Profile Differences and Recommendations
Vanilla bean is the traditional choice for crème brûlée, and for good reason. The tiny black seeds from the pod infuse the custard with an intense, aromatic flavor that is simply unmatched by vanilla extract. While both forms of vanilla can be used, the flavor profile of vanilla bean is far superior, offering a more complex and fragrant taste. When using vanilla bean, split the pod lengthwise, scrape out the seeds, and add both the seeds and the pod to the cream for the utmost flavor extraction.
If vanilla bean is not an option, opt for high-quality pure vanilla extract as a substitute, but keep in mind that the flavor will be less concentrated.
Role of Egg Yolks in Creating a Rich, Creamy Texture
Egg yolks play a crucial role in the structure and richness of crème brûlée. They are responsible for thickening the custard and imparting a silky mouthfeel. When combined with cream and sugar, egg yolks emulsify and create a custard that is smooth and luscious. For the best results, use fresh, high-quality eggs, as they will enhance the flavor and color of the final dessert.
Sugar: Sweetness and the Process of Caramelization
Granulated sugar is used both in the custard and for the caramelized topping. In the custard, sugar balances the richness of the cream and yolks, providing just the right amount of sweetness. For the caramelized topping, it’s essential to use granulated sugar, as it melts and caramelizes evenly under heat. When sprinkling sugar on top of the custard, ensure an even layer to promote uniform caramelization.
Salt: Enhancing Flavors
While it may seem counterintuitive, a small pinch of salt can elevate the flavors in crème brûlée. Salt serves to balance the sweetness and enhance the overall taste, bringing out the richness of the cream and the aromatic notes of the vanilla. Use fine sea salt for a subtle yet effective flavor boost.
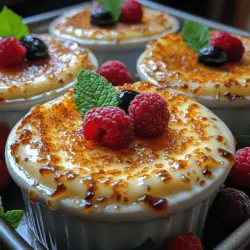
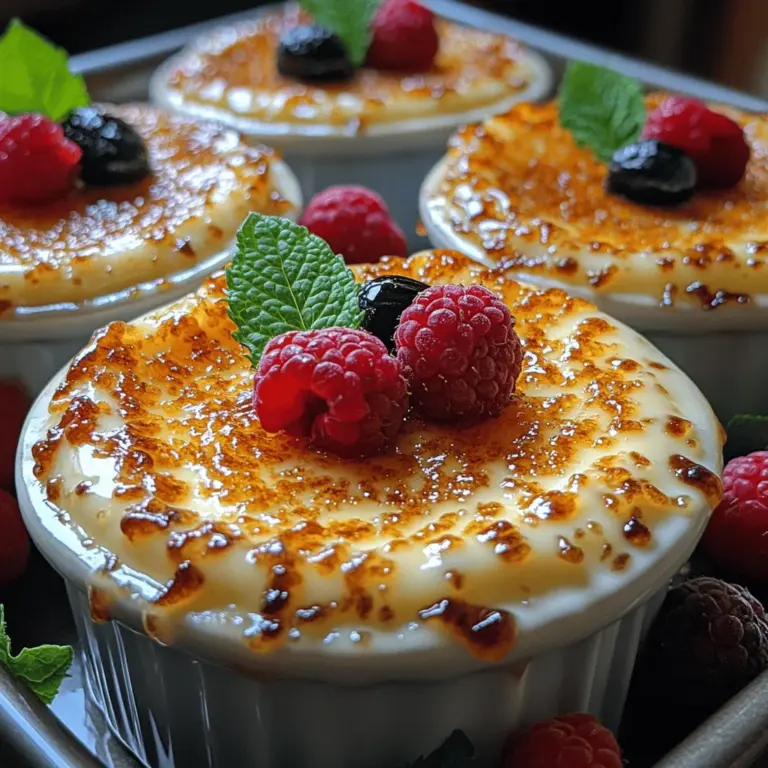
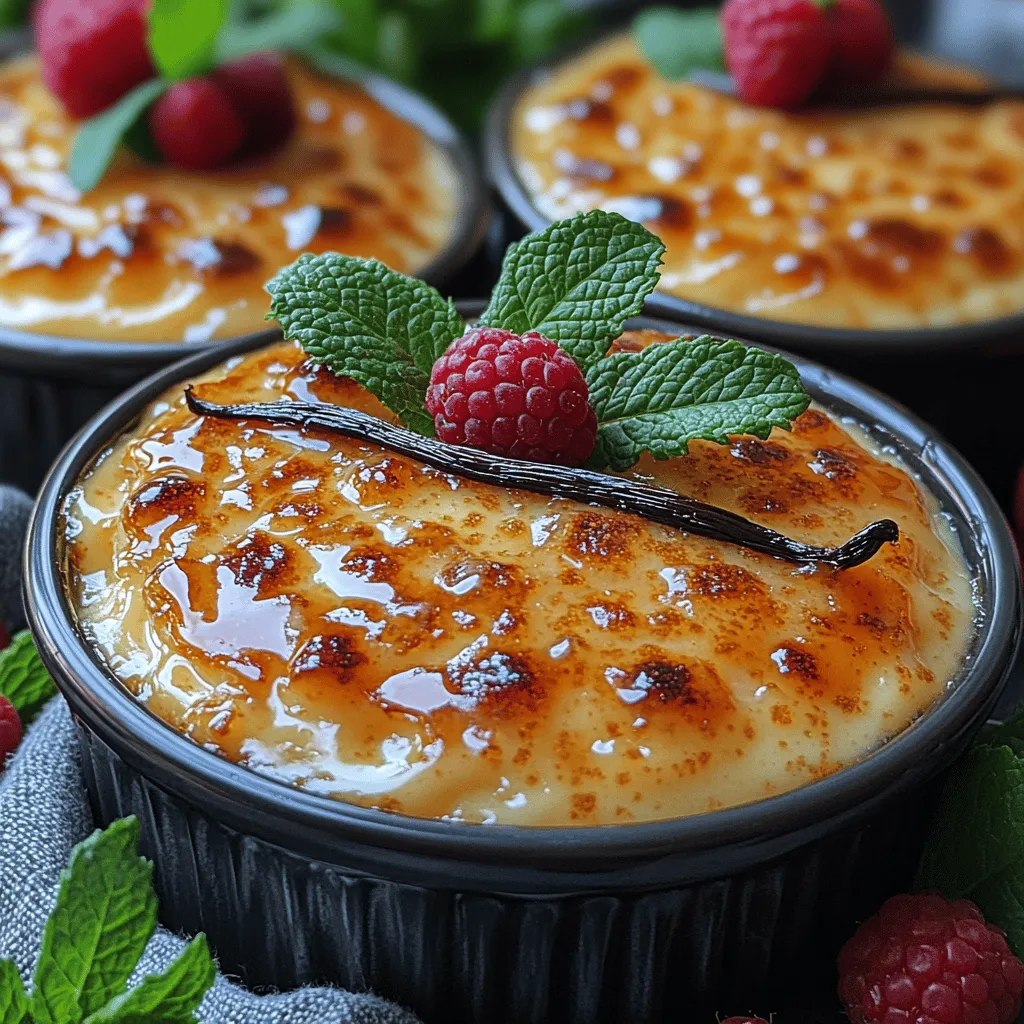
Optional Garnishes: Fresh Berries and Mint Leaves for Presentation
To add an extra touch of elegance to your crème brûlée, consider garnishing with fresh berries or mint leaves. Raspberries, strawberries, or blueberries not only provide a pop of color but also add a refreshing contrast to the rich custard. A sprig of mint can enhance the presentation and add a hint of freshness that complements the dessert beautifully.
Preparation Steps
Now that we’ve explored the essential ingredients for our Divine Vanilla Bean Crème Brûlée, let’s dive into the preparation process. Follow these steps to ensure your custard is perfectly baked and caramelized.
Preheating the Oven: Importance of Temperature Control in Baking Custards
Begin by preheating your oven to 325°F (160°C). Proper temperature control is vital when baking custards, as high heat can cause the eggs to curdle, resulting in an undesirable texture. Baking at a lower temperature allows for gentle cooking, ensuring a smooth and creamy custard.
Heating the Cream: Techniques for Extracting Maximum Flavor from Vanilla
In a medium saucepan, combine the heavy cream and the split vanilla bean pod along with its scraped seeds. Heat the mixture over medium heat, stirring occasionally, until it is hot but not boiling. The goal is to infuse the cream with the rich flavor of vanilla, so be attentive to the process. Once the cream is hot, remove it from the heat and let it steep for about 15 minutes. This resting period allows the vanilla to fully permeate the cream, creating a fragrant base for your custard.
After steeping, remove the vanilla pod and set the cream aside to cool slightly. This step is essential, as adding hot cream directly to the egg yolks can lead to curdling.
Whisking Together Egg Yolks and Sugar
In a separate bowl, whisk together the egg yolks and granulated sugar until the mixture is pale and slightly thickened. This process helps to dissolve the sugar and create a smooth custard base. Gradually add the warm cream to the egg yolk mixture, whisking continuously to combine. This technique, known as tempering, ensures that the eggs do not cook too quickly, resulting in a silky-smooth custard.
Once fully combined, strain the custard through a fine-mesh sieve into a large measuring cup or bowl to remove any potential lumps and ensure a velvety texture.
As we continue through the recipe, you’ll discover the final steps to creating this divine dessert, including how to bake the custard to perfection and achieve that sought-after caramelized sugar topping. Stay tuned for the next part of this delicious journey!
Whisking Egg Yolks and Sugar
To achieve the ideal consistency for your vanilla bean crème brûlée, begin by whisking together the egg yolks and sugar. Use a medium-sized bowl to hold the yolks—ensuring you separate them from the whites with precision. Aim for about five large egg yolks and a half-cup of granulated sugar. With a whisk or electric mixer, blend the egg yolks and sugar until they turn a pale yellow and the mixture becomes slightly thickened. This process is key; it incorporates air into the yolks, which not only helps to create a creamy texture but also contributes to the custard’s richness.
Tip: When whisking, don’t rush. A gentle, steady motion will help prevent bubbles from forming, which can lead to a less than desirable texture in the final product. Your goal is a smooth, slightly thickened mixture that has a ribbon-like consistency when you lift the whisk.
Combining Mixtures
After preparing your egg yolk and sugar mixture, it’s time to combine it with the warm cream mixture. The cream should be heated until just below a simmer, allowing the vanilla beans to infuse their flavor. Here’s where the technique of tempering comes into play. Slowly drizzle the warm cream into the egg yolk mixture while whisking continuously. This step is crucial as it gradually raises the temperature of the egg yolks without scrambling them.
Importance of Tempering: If you add the cream too quickly, the sudden heat can cause the yolks to curdle, ruining the creamy custard you are aiming for. By tempering, you ensure a smooth integration of the two mixtures, resulting in a velvety custard.
Straining the Custard
Once your mixtures are well combined, it’s essential to strain the custard through a fine mesh sieve into another bowl or measuring cup. This step removes any potential curdled bits from the egg yolks, ensuring a perfectly smooth texture in your final dessert.
Tip: Straining the custard may seem like an extra step, but it’s a crucial one for achieving that luxurious mouthfeel that crème brûlée is known for. Take your time with this process to ensure no lumps go unnoticed.
Ramekin Preparation
Selecting the right ramekins is vital for your crème brûlée. Typically, 6-ounce ramekins are standard for individual servings, but you can use larger ones if you prefer. The shape also matters; wide, shallow ramekins allow for a larger surface area, which is essential for caramelization later on.
Tip: Before filling your ramekins, lightly coat them with a bit of butter or cooking spray. This not only helps with the release of the custard but also enhances the flavor as it bakes.
Creating a Water Bath
The water bath (or bain-marie) is a technique that protects the delicate custard from direct heat, allowing for even cooking. To create a water bath, place the filled ramekins in a larger baking dish. Then, carefully pour hot water into the dish until it reaches halfway up the sides of the ramekins.
Benefits of a Water Bath: This method regulates the temperature of the custard, preventing it from cooking too quickly or unevenly, which can lead to cracks or a rubbery texture. It’s essential for the silky custard consistency you desire.
Baking Process
Now it’s time to bake your crème brûlée. Preheat your oven to 325°F (160°C) before placing the baking dish with the ramekins inside. Bake for 30 to 40 minutes, or until the custard is set around the edges but still slightly jiggly in the center.
Signs of Readiness: A toothpick inserted into the center should come out with only a few custard clinging to it, indicating that it is cooked but not overdone. Overbaking can lead to a grainy texture—something you want to avoid at all costs.
Cooling the Custard
After baking, remove the ramekins from the water bath carefully, as they will be hot. Let them cool at room temperature for about 30 minutes before transferring them to the refrigerator. Chilling is essential; allow the crème brûlée to set in the fridge for at least four hours, or overnight if time permits. This chilling period not only enhances the flavors but also ensures that the custard achieves the perfect texture.
Tip: Cover the ramekins with plastic wrap while they chill to prevent any odors from the refrigerator from affecting the delicate flavor of your dessert.
Caramelizing the Sugar
Once your crème brûlée has chilled and is ready for the finishing touch, it’s time to caramelize the sugar on top. This step transforms the custard into a show-stopping dessert.
Techniques for Caramelization: You have two main methods for caramelizing the sugar: using a kitchen torch or a broiler.
1. Kitchen Torch: This method gives you precise control. Sprinkle a thin, even layer of granulated sugar over the top of each custard. Use your torch to melt and caramelize the sugar until it forms a golden crust. Keep the torch moving to avoid burning the sugar.
2. Broiler Method: If you don’t have a kitchen torch, place the ramekins on a baking sheet and place them under the broiler. Watch them closely; this method can go from perfectly caramelized to burnt very quickly.
Achieving the Perfect Golden Crust: Regardless of the method, you want to aim for a crisp, golden layer that adds both texture and a delightful contrast to the creamy custard beneath.
The Science Behind Caramelization: Caramelization occurs when sugar is heated, causing a chemical reaction that changes its structure and flavor. This not only enhances the sweetness but also adds a complex, slightly bitter flavor that balances the richness of the crème brûlée.
Presentation and Serving Suggestions
To serve your crème brûlée, let it sit for a minute after caramelizing the sugar to allow the crust to harden. The ideal serving temperature for crème brûlée is slightly chilled, with the topping still warm.
Garnishing Ideas: Fresh berries, like raspberries or strawberries, add a splash of color and a burst of acidity that complements the sweetness of the custard. A sprig of mint can add an aromatic touch that elevates the presentation.
Pairing Suggestions: Consider serving your crème brûlée with a glass of dessert wine, such as Sauternes or a sweet Riesling. Alternatively, a rich coffee or espresso can provide a delightful contrast to the sugary dessert.
Conclusion
Creating a divine vanilla bean crème brûlée at home is not just about the final product; it’s about the journey of crafting a dessert that feels both luxurious and rewarding. From the careful whisking of egg yolks to the delicate process of caramelizing sugar, every step contributes to the creation of this classic French dessert.
Don’t hesitate to experiment with variations—try infusing different flavors like lavender, citrus, or even coffee to personalize your crème brûlée. The satisfaction of serving a restaurant-quality dessert to friends and family will make all the effort worthwhile. Embrace the art of making crème brûlée, and indulge in the delightful experience of sharing this timeless treat. Enjoy the process, and savor every luscious bite!