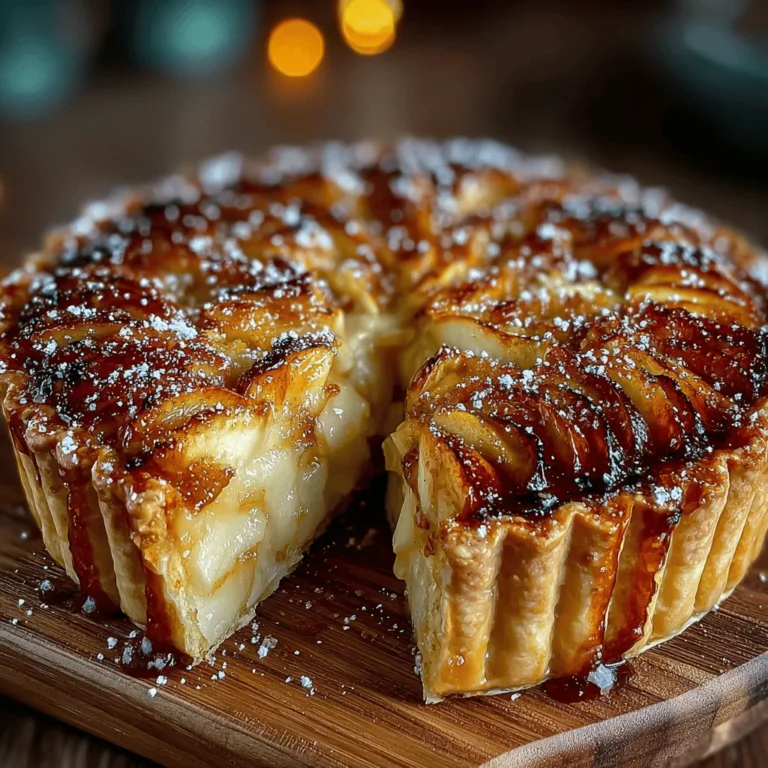
Apple pie is more than just a dessert; it is a cherished symbol of comfort and tradition in many culinary cultures around the world. The “Timeless Apple Delight Pie” stands as a beloved family favorite, combining the perfect balance of tart and sweet flavors with the use of Granny Smith and Honeycrisp apples. This recipe encapsulates the warmth of home, making it ideal for any occasion—be it a holiday gathering, a family dinner, or simply a cozy evening. In this article, you can expect to find detailed instructions on preparing the pie crust, creating the apple filling, and achieving that perfect golden finish, along with insights into each ingredient’s role in crafting this delightful dessert.
Ingredients
For the Pie Crust
– 2 ½ cups all-purpose flour
– 1 cup unsalted butter, chilled and cubed
– 1 teaspoon salt
– 1 tablespoon granulated sugar
– 6-8 tablespoons ice water
For the Apple Filling
– 6 cups Granny Smith apples, peeled, cored, and sliced
– 4 cups Honeycrisp apples, peeled, cored, and sliced
– 1 cup granulated sugar
– 2 tablespoons all-purpose flour
– 1 teaspoon ground cinnamon
– ½ teaspoon ground nutmeg
– 2 tablespoons lemon juice
– 1 teaspoon vanilla extract
For the Topping
– 1 egg, beaten (for egg wash)
– 1 tablespoon coarse sugar (optional, for sprinkling)
Instructions
1. Prepare the Pie Crust: In a large bowl, combine the flour, salt, and sugar. Add the chilled, cubed butter and mix until the mixture resembles coarse crumbs. Gradually add ice water, one tablespoon at a time, mixing until the dough comes together. Divide the dough in half, shape into disks, wrap in plastic wrap, and refrigerate for at least 1 hour.
2. Prepare the Apple Filling: In a large mixing bowl, combine the sliced Granny Smith and Honeycrisp apples. Add sugar, flour, cinnamon, nutmeg, lemon juice, and vanilla extract. Stir gently to combine, ensuring the apples are evenly coated. Set aside to allow the flavors to meld.
3. Roll Out the Pie Crust: On a floured surface, roll out one disk of dough to fit your pie dish (approximately 12 inches in diameter). Transfer the rolled dough to the pie dish, pressing it gently into the bottom and sides.
4. Fill the Pie: Pour the apple filling into the crust, spreading it evenly. Dot with small pieces of butter if desired.
5. Top the Pie: Roll out the second disk of dough and place it over the apple filling. Trim any excess dough and crimp the edges to seal. Cut slits in the top crust to allow steam to escape. Brush the top with the beaten egg and sprinkle with coarse sugar if using.
6. Bake: Preheat your oven to 425°F (220°C). Bake the pie for 15 minutes, then reduce the temperature to 350°F (175°C) and continue baking for an additional 30-40 minutes, or until the apples are tender and the crust is golden brown.
Understanding the Ingredients
Pie Crust Ingredients
The pie crust serves as the foundation of the Timeless Apple Delight Pie. Using all-purpose flour is essential for providing the necessary structure while ensuring a tender crumb. Unsalted butter enriches the flavor and contributes to the flakiness of the crust. The addition of ice water is crucial; it helps to bind the dough without melting the butter, which is key for achieving that perfect texture.
Apple Filling Ingredients
Selecting the right apple varieties is vital for achieving the desired flavor profile. Granny Smith apples bring a delightful tartness, while Honeycrisp apples add a natural sweetness. The inclusion of spices like cinnamon and nutmeg deepens the flavor, creating a warm and inviting aroma. Lemon juice and vanilla extract serve to balance the sweetness, enhancing the overall taste of the filling.
Topping Essentials
An egg wash is applied to the top crust to create a beautiful golden finish upon baking. For those looking for a little extra crunch and sweetness, a sprinkle of coarse sugar can be added, enhancing both the aesthetic and textural quality of the pie.
Making the Perfect Pie Crust
Creating the perfect pie crust is an art that balances technique and ingredients. Start by ensuring that all ingredients are kept cold; this is key to achieving a flaky texture. When mixing the dough, be careful not to overwork it—this can lead to a tough crust. Rolling the dough should be done gently, and common pitfalls like cracking or shrinking can be avoided by handling the dough with care and chilling it before baking.
By following these guidelines, your Timeless Apple Delight Pie will not only taste fantastic but also look stunning when served. In the next section, we will dive into creating the apple filling, ensuring each bite is filled with flavor and nostalgia.
Tips for Perfecting Your Apple Delight Pie
Achieving the Ideal Apple Filling
When preparing your apple filling, allow the sliced apples to rest for at least 30 minutes. This step is vital as it helps the apples release their natural juices, creating a flavorful base for your pie. Additionally, consider the balance of sweetness and spice. A combination of sweet apples like Fuji or Honeycrisp with tart varieties like Granny Smith will provide depth in flavor. Experimenting with spices like cinnamon, nutmeg, or even allspice can enhance the taste, so adjust the quantities to suit your preferences.
Alternative Apple Combinations
To bring variety to your Timeless Apple Delight Pie, try mixing different apple types. For instance, a blend of tart and sweet apples can create a more complex flavor profile. Consider options like Braeburn or Jonagold for an exciting twist. Each apple variety offers unique flavors and textures, so don’t hesitate to mix and match to find your perfect combination.
Assembling the Pie
Step-by-Step Assembly Instructions
Begin by rolling out your pie crust evenly to fit your pie pan. Ensure the crust is about 1/8 inch thick for optimal texture. Carefully transfer the crust into the pan, pressing it gently into the edges and allowing any excess to hang over the sides. Next, layer the apple filling evenly. Start by adding a generous scoop of the filling, then add more in layers, ensuring even distribution throughout for consistent flavor in every slice.
Sealing and Venting the Crust
To seal the pie, fold the overhanging crust over the filling and crimp the edges together using your fingers or a fork. This step not only secures the filling but also creates an appealing decorative edge. Don’t forget to create vents in the top crust to allow steam to escape during baking; this can be done using a knife to cut slits or by making a lattice design.
Baking the Pie to Perfection
Baking Temperatures and Times
Bake your pie at a high temperature of 425°F (220°C) for the first 15-20 minutes. This initial heat will help your crust achieve a golden-brown color. Afterward, reduce the temperature to 350°F (175°C) for the remaining baking time, which usually takes about 30-40 minutes. This method ensures that the pie bakes evenly without burning the crust.
Monitoring the Baking Process
Keep a close eye on your pie as it bakes. Look for visual cues, such as bubbling juices and a golden crust, to determine doneness. If you notice the edges of the crust browning too quickly, shield them with strips of aluminum foil to prevent burning.
Cooling and Serving Suggestions
Importance of Cooling
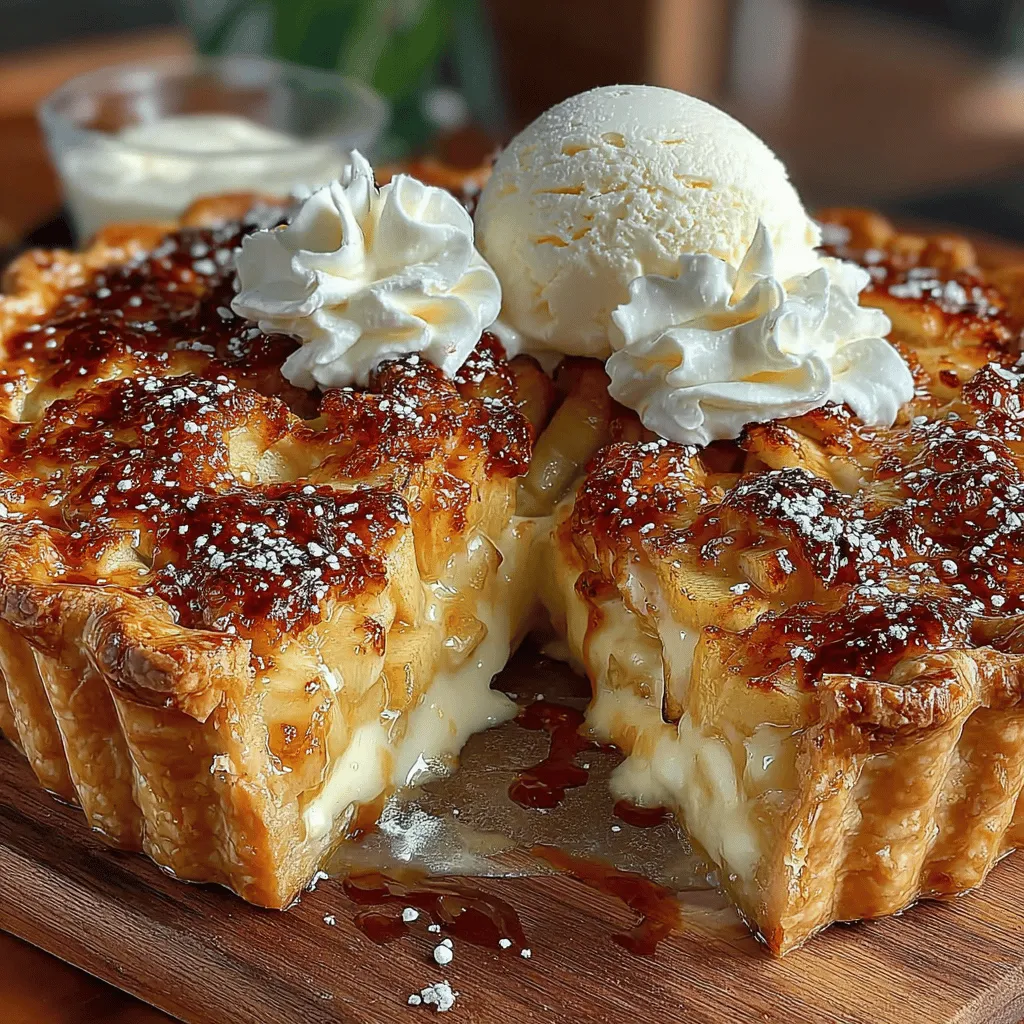
Allow your pie to cool for at least two hours before slicing. This cooling period is crucial as it helps the filling set, ensuring that each slice holds its shape. If you cut into the pie too soon, you may end up with a runny filling.
Elevating the Serving Experience
For an enhanced taste experience, serve your Timeless Apple Delight Pie with a scoop of vanilla ice cream or a dollop of freshly whipped cream. Consider sprinkling a pinch of cinnamon or drizzling caramel sauce over the top for an extra touch of indulgence. Presentation is key; serve the pie on a decorative platter and garnish with a few apple slices or a sprinkle of cinnamon for visual appeal.
Conclusion
Baking a classic apple pie is not just about following a recipe; it’s about creating memories and sharing joy with loved ones. The Timeless Apple Delight Pie is a perfect centerpiece for gatherings, evoking warmth and nostalgia. We encourage you to try this recipe, experiment with flavors, and enjoy the process of baking. Your kitchen will soon be filled with delightful aromas, and your family and friends will cherish the delicious results for years to come.
